Ceeniq · Shot Blueprint
Medium close-up · naturalistic lighting
July 15, 2026
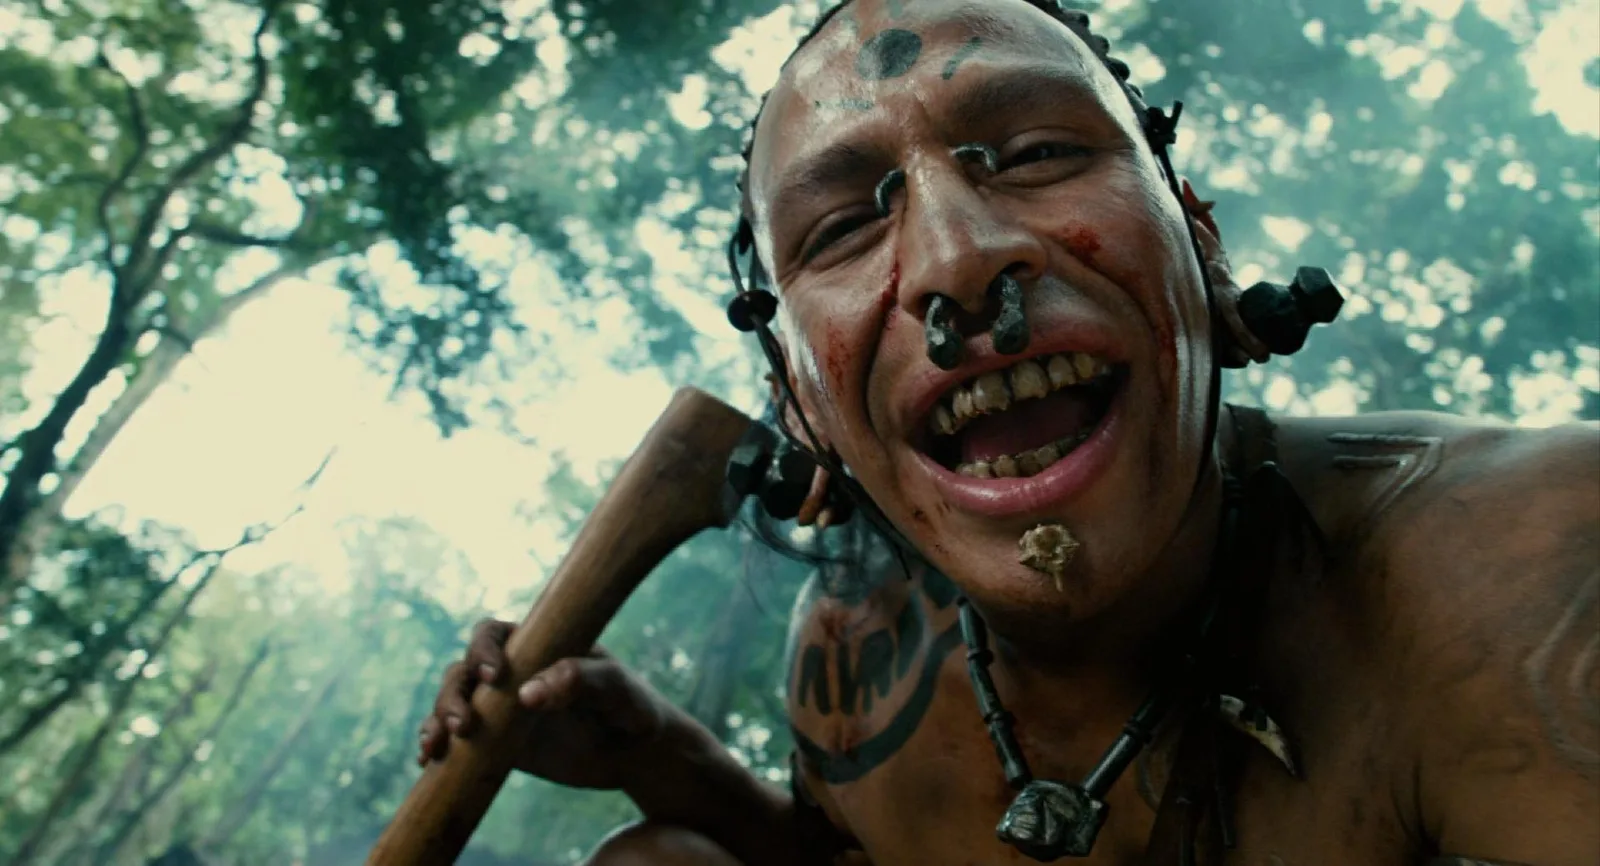
This extreme wide-angle medium close-up aggressively pulls the viewer into the frame, capturing a moment of primal intensity and menace. The low camera angle and distorted perspective amplify the subject's unsettling expression and physical presence, making the shot feel raw and immediate. The naturalistic lighting, filtering through a jungle canopy, adds to the chaotic atmosphere.
This is an aggressive, in-your-face shot designed to feel visceral and threatening. We'll use an extremely wide lens positioned low and close to the subject to create distortion and forced perspective. The lighting mimics harsh, dappled sunlight filtering through a jungle canopy, creating a bright, slightly blown-out background that contrasts with the detailed, textured foreground subject.
Camera setup
- Lens
- A 14mm or 16mm Cooke S4/i or Zeiss Ultra Prime is the hero here. The goal is the distinct barrel distortion and the ability to get incredibly close while still seeing the environment. The wide aperture helps throw the background foliage completely out of focus. For a more budget-conscious shoot, a Rokinon Xeen 14mm T3.1 or a Sigma 14mm f/1.8 Art lens will achieve a very similar perspective distortion.
- Position
- The camera is extremely low, maybe a foot off the ground, and tilted up at a steep 45-degree angle. It's positioned just two to three feet from the actor's face, forcing him to lean into the lens. This low angle makes the subject dominant and menacing, and the proximity creates that unsettling, invasive feeling.
- Settings
- Shoot wide open or close to it, around T2.8, to obliterate the background. Use a standard 180-degree shutter (1/48 at 24fps). On a bright day, you'll need heavy ND filtration, probably an ND 1.2 or 1.5, to maintain that shallow depth of field. Start your camera at its native ISO, likely around 800, and expose for the skin tones, letting the sky in the background go hot.
- Alternatives
- A 24mm lens would normalize the perspective, making the character feel less like a monster and more like a man. The shot would become more observational and less subjective. An 18mm would be a good middle ground, retaining the wide feel and menace without such extreme facial distortion. A 10mm fisheye would push the distortion into a stylized, almost cartoonish territory, potentially undermining the raw threat of the moment.
Lighting setup
- 1key · overhead · far
- 2fill · below · near
1.Key: Overcast Sky/Large Overhead Soft Source
Directly overhead and slightly in front of the subject. In a real jungle, this is the bright sky punching through the canopy.
This is the dominant source. To recreate it, you'd use a large 20x20 frame of light grid cloth or ultrabounce, with a powerful HMI like an ARRI M90 punching into it from above. The goal is a huge, soft, high-output source that wraps around the top of the subject's head and face, creating highlights on his brow, nose, and teeth. Let the background blow out by about two stops over key.
Recreate the look
Starting-point editing settings for each app. Fine-tune against your source image.
Apple Photos
- Exposure
- +0.15
- Highlights
- -30
- Shadows
- +40
- Contrast
- -15
- Black Point
- +15
Slightly lift the overall exposure.
Pull back the hot sky to retain some detail.
Lift the shadows for that milky, non-crushed look.
Reduce global contrast to allow for the lifted shadows.
Raise the floor of the blacks, key to the bleach bypass feel.
Equipment list
Ultra-Wide Prime Lens (14mm)
Creates the signature perspective distortion and aggressive intimacy.
Budget option: Rokinon 14mm T3.1 or Sigma 14mm f/1.8 Art
View on AmazonARRI Alexa Mini or similar cinema camera
Provides high dynamic range to handle the hot background and detailed shadows.
Budget option: Blackmagic Pocket Cinema Camera 6K
View on AmazonLarge Diffusion Frame (20'x20')
Creates the massive, soft overhead key light that mimics a jungle canopy opening.
Budget option: Large white reflector or shooting on an overcast day.
View on AmazonHigh-Powered HMI (ARRI M90)
Provides the raw power needed to create a bright, blown-out source through heavy diffusion.
Budget option: Using the actual sun on a clear day, diffused or reflected.
View on Amazon
Creative direction
Art & staging
The subject dominates the frame, leaning forward aggressively into the camera's personal space. Staging is simple: he is crouched low, looking down into the lens. The background is critical: dense jungle foliage is needed to create the dappled green and bright-sky texture. Production design is paramount here; the authenticity of the tattoos, piercings, and the worn axe handle sells the character's primal nature. The blood and grime on his face are not just details, they are central to the raw feel of the shot.
Director's commentary
This shot is designed to put the audience directly in the path of a predator. It's a subjective point of view, likely from the ground looking up. The extreme wide angle isn't just a stylistic choice; it's a weapon. It warps the villain's face, making him grotesque and monstrous, and it creates a terrifying intimacy. I would direct the actor to ignore the camera as a piece of equipment and see it as the person they have cornered. The performance needs to be one of triumphant cruelty. Lean in, invade the space, let the glee of the hunt read in your eyes. The proximity and distortion will do the rest.
On a budget
Shoot in a real forest on a bright, overcast day. The cloud cover will act as your giant 20x20 diffusion. Use a large white reflector or even a bedsheet to bounce light from the sky down onto your subject if you need more shaping. For the camera, a mirrorless body with a cheap, manual ultra-wide lens (like a 7artisans or Samyang 12mm) will get you the distortion. Negative fill can be a piece of black cardboard or fabric. Skip the hazer and hope for a humid day.