Ceeniq · Shot Blueprint
Medium close-up · low-key lighting
July 21, 2026
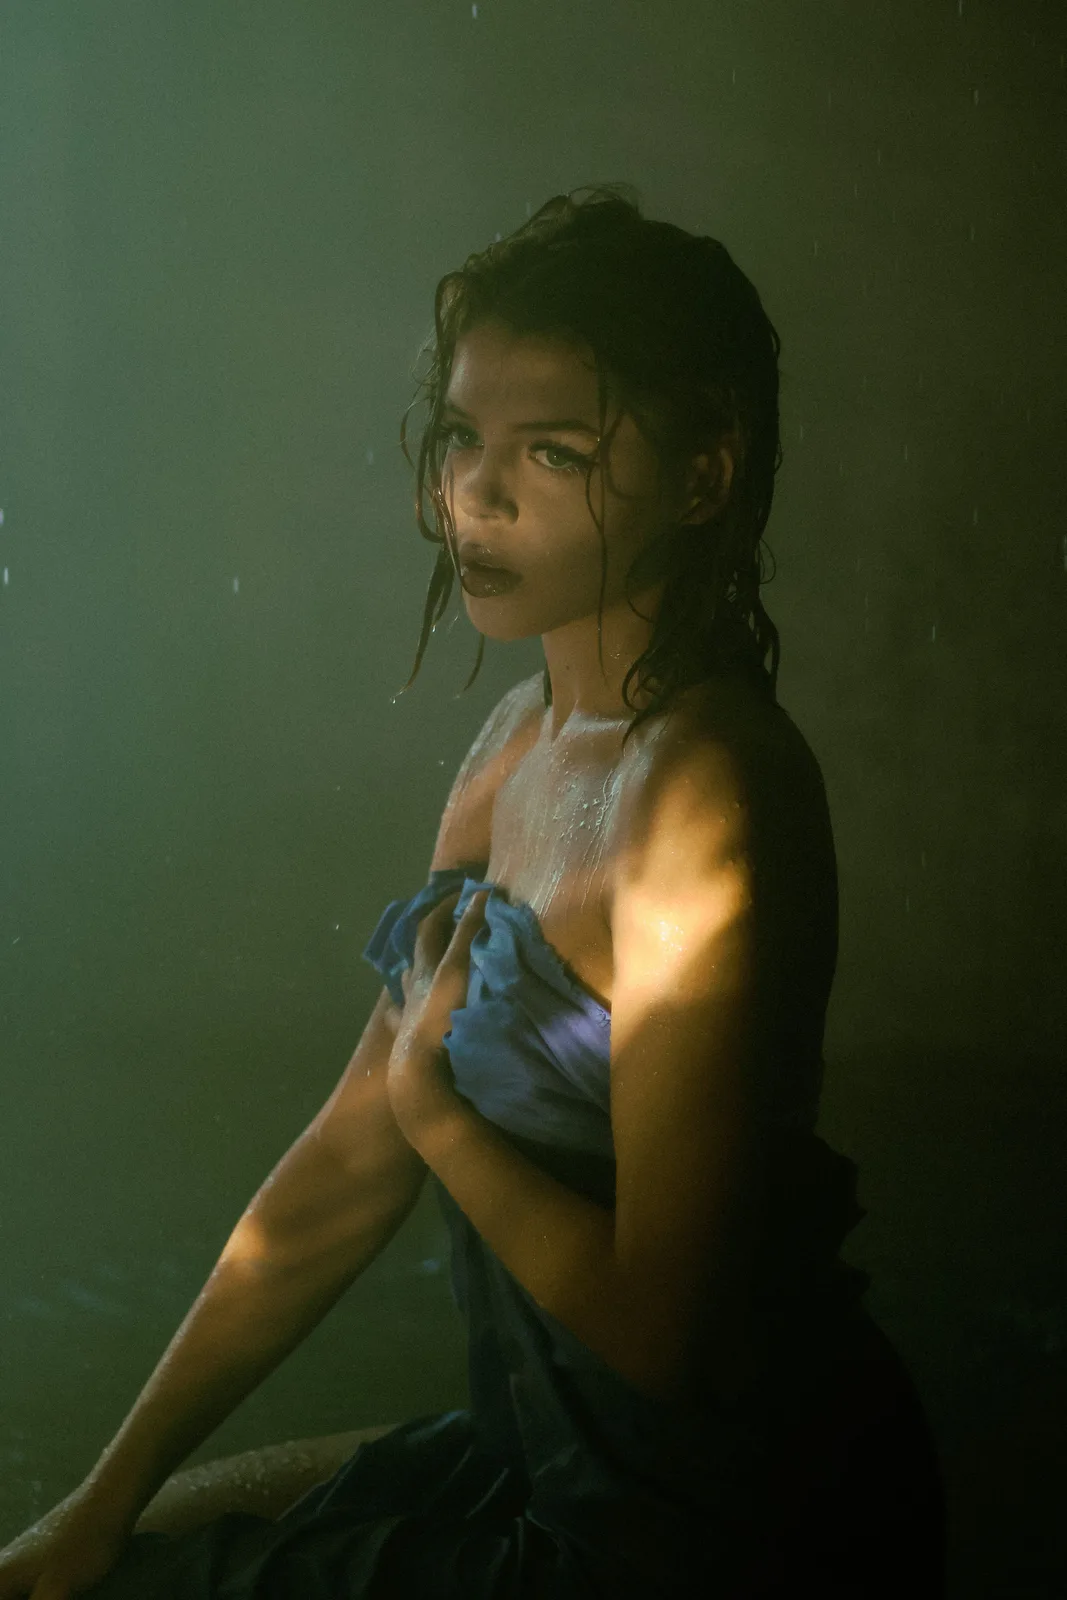
This shot masterfully uses a single hard, warm light source to sculpt the subject, highlighting her wet skin and pensive expression against a dark, moody background. The dramatic lighting creates a sense of intimacy and vulnerability, drawing the viewer into her emotional state. The strong contrast and selective illumination emphasize texture and form, making the frame highly evocative.
This is a classic low-key portrait, creating drama through subtraction. The shot hinges on a single, hard key light to sculpt the subject, with heavy atmosphere and a rain effect adding texture and mood. The goal is to create a pocket of warm, intimate light within a cool, mysterious void, emphasizing vulnerability and introspection.
Camera setup
- Lens
- A 50mm prime lens on a full-frame sensor is the right choice here. It provides a natural, honest field of view that feels intimate without the distortion of a wider lens. The focus is soft, suggesting an aperture around T2.8, which also helps separate the subject from the atmospheric background. For a budget option, any brand's 50mm f/1.8 is a workhorse that will get you 90% of the way there.
- Position
- The camera is positioned for a medium close-up, about 5-6 feet from the subject. The height is roughly level with her shoulder or chest, pointing straight on. She is seated or kneeling, angled about 45 degrees away from the camera, looking towards camera left. This three-quarter profile is more compelling and less confrontational than a straight-on shot.
- Settings
- Start with your camera at its native ISO, likely around 800. Set your shutter to 1/50th of a second for a standard 180-degree shutter at 24fps. The key is your aperture; begin at T2.8. This will give you a shallow enough depth of field to soften the background and the rain, but keep the subject's face sharp. You'll be exposing for the highlights on her skin, letting the rest of the frame fall into shadow. Don't be afraid of the dark parts of the image.
- Alternatives
- An 85mm f/1.8 would create a more compressed, painterly look, isolating the subject further with a creamier background blur. A 35mm f/2 would feel more immediate and raw, pulling the viewer closer and making the environment a slightly larger part of the story. A vintage lens like a Helios 44-2 58mm would introduce unique, swirling bokeh and softer contrast, adding an extra layer of organic character.
Lighting setup
- 1key · above · medium
- 2ambient · at eye level · far
1.Key: Hard Light Source
Positioned high, camera right, at roughly a 45-degree angle to the subject. It's aimed down to create a sharp slash of light that rakes across her face, shoulder, and arm, creating defined shadows and highlights.
Use a theatrical Leko or a hard-focused fresnel (like an Arri 650W or an Aputure 300d with a fresnel attachment). The light needs to be shaped with barn doors or flags to prevent spill. Gel the light with a Full CTO (Color Temperature Orange) to get that warm, almost candle-lit tone on her skin.
Recreate the look
Starting-point editing settings for each app. Fine-tune against your source image.
Apple Photos
- Exposure
- -0.15
- Highlights
- -30
- Shadows
- +40
- Black Point
- +15
- Warmth
- +25
Slightly underexpose to protect the highlights.
Control the brightest parts of the skin.
Lift the shadows to reveal some detail in the darks.
Lift the blacks for a faded, filmic look.
Introduce the overall warm tone.
Equipment list
Leko or Fresnel Light (e.g., Aputure LS 600d with F10 Fresnel)
To create the hard, shapeable key light that defines the shot's high-contrast look.
Budget option: A Godox SL60W with a cheap fresnel attachment or even a hardware store spotlight.
View on AmazonHazer or Fog Machine
To create the atmospheric haze that catches the light and builds the moody background.
Budget option: A simple party fogger used sparingly.
View on AmazonFull CTO Gel
To warm up the key light, giving the skin its rich, golden hue.
Budget option: A cheap orange lighting gel from an online supplier.
View on Amazon50mm Prime Lens
Provides a natural field of view for an intimate but undistorted portrait.
Budget option: Yongnuo 50mm f/1.8 or a vintage manual focus 50mm lens with an adapter.
View on Amazon
Creative direction
Art & staging
The scene is all about texture. The subject is seated against a simple black background (duvetyne or a painted wall). A haze machine is essential to fill the space with a medium-density fog; this catches the light and creates the atmospheric depth. A rain rig or even a garden hose with a spray nozzle should be positioned overhead, out of frame, to create the water effect. The subject's skin and hair should be thoroughly wetted down. The simple blue cloth she holds provides a cool color contrast against her warm skin.
Director's commentary
This shot captures a private, unguarded moment. The light reveals her physically but the shadows protect her emotional state, creating a powerful tension. It's a moment of contemplation, not performance. I would direct the actor to find a single, specific thought or memory to hold onto. Her gaze should be unfocused, directed into the empty space. Any movement should be slow and natural, as if she is unaware of the camera. The goal is to make the audience feel like they are witnessing something intensely personal and real.
On a budget
You can achieve this with one light. Use a single LED spotlight with a focusing lens, or even a cheap tungsten work light from a hardware store. Gel it with an orange lighting gel. For the rain, a garden hose with a fine mist setting works perfectly. A party fog machine will provide the haze. Hang a black bedsheet for the background. Use a spray bottle to keep the subject wet. The green tint in the shadows can be added entirely in post-production.