Ceeniq · Shot Blueprint
Wide · stylized lighting
July 24, 2026
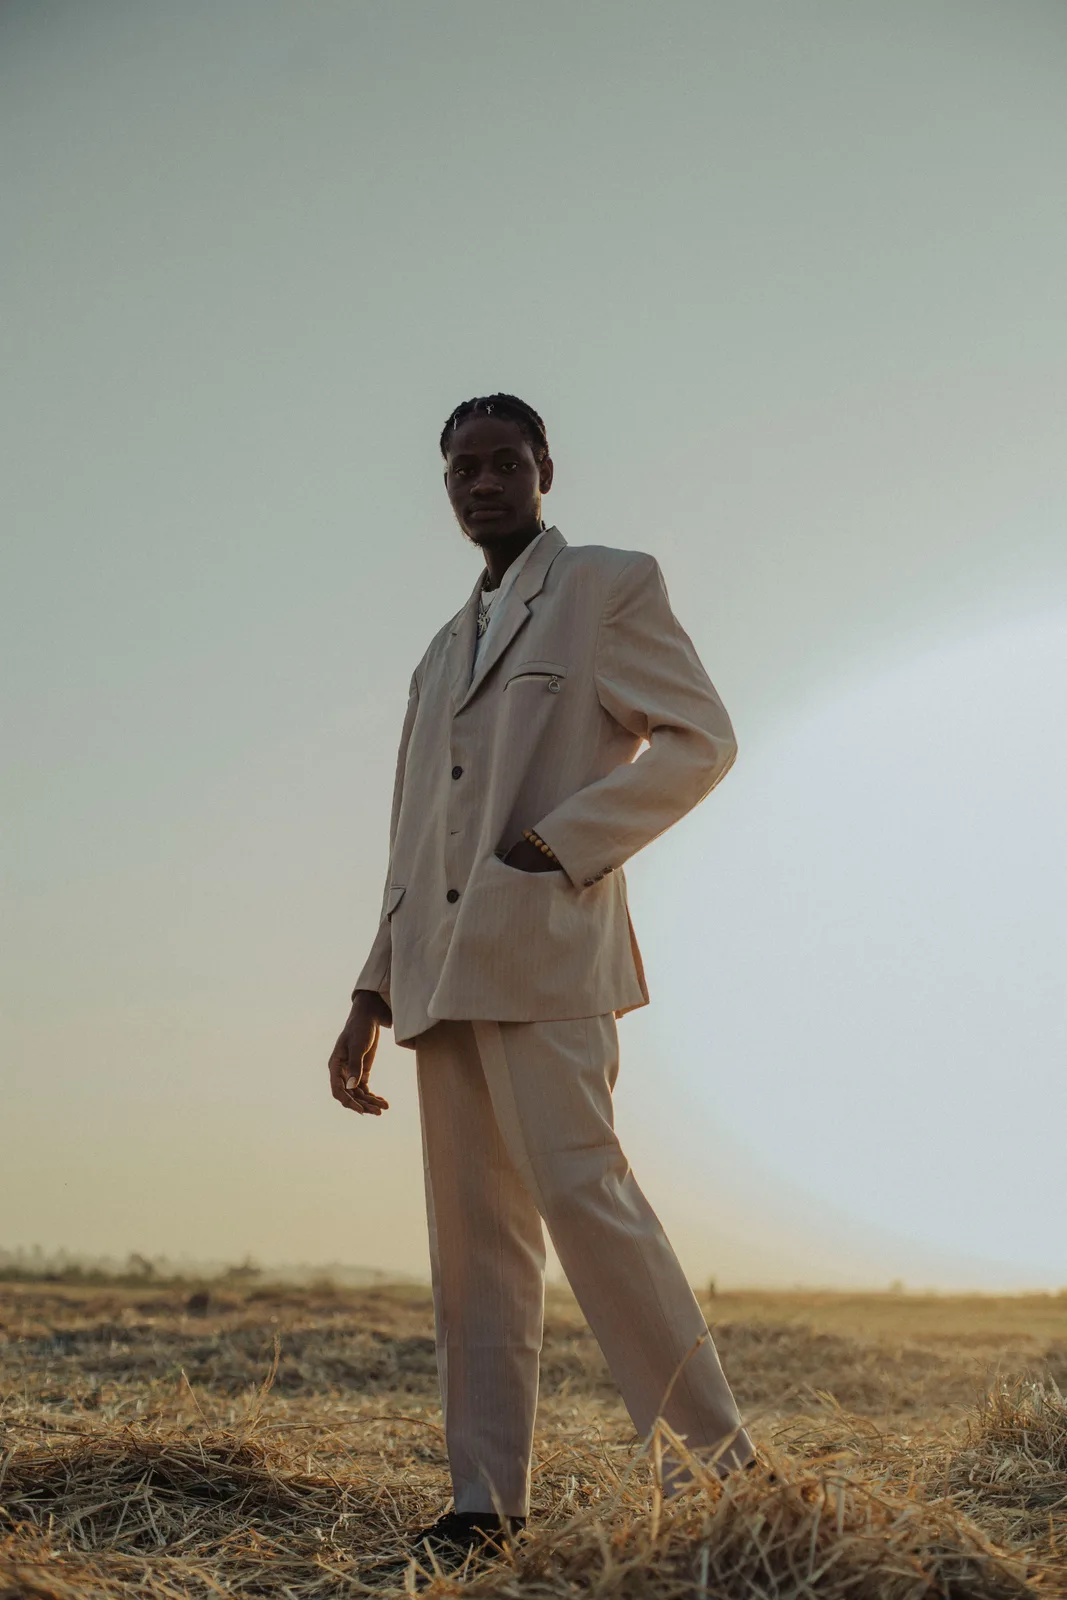
This wide shot captures a subject standing confidently in a field, silhouetted against a vast, luminous sky. The low angle and backlight from the setting sun create a powerful, isolated atmosphere, emphasizing the subject's stature and thoughtful presence within the expansive landscape.
This is a low angle portrait that uses natural backlight from the setting sun to create a heroic, statuesque feeling. The look hinges on shooting during the last moments of golden hour, using the sky as a massive soft fill, and a specific grade that lifts the blacks and desaturates the palette for a filmic, timeless quality.
Camera setup
- Lens
- A medium telephoto lens, likely an 85mm on a full frame sensor. This focal length provides slight compression, isolating the subject and making them feel grand against the sky without the flattening effect of a longer lens. A good 85mm f/1.8 is a solid choice. For a tighter budget, a 50mm f/1.8 will also work well, though it will feel a bit wider and more immediate.
- Position
- The camera is positioned very low, about ankle to shin height, and tilted upwards. This is the source of the shot's power, making the subject loom large against the open sky. The camera is approximately 12 to 15 feet from the subject to achieve this full-length framing.
- Settings
- Shoot with a moderately open aperture, around f/2.8 to f/4. This keeps the subject sharp while softly rendering the foreground grass and distant horizon. Set your ISO to its base, likely 100 or 200. With the sun behind the subject, expose for the shadow side of their face. Let the sky be bright, but try to avoid hard clipping. A starting shutter speed would be around 1/400s, but adjust as needed to get the right skin exposure.
- Alternatives
- A 50mm f/1.8 would be a great alternative, creating a look that feels more natural and less compressed, with a wider view of the environment. A 35mm lens would exaggerate the low angle perspective, creating more distortion and making the subject feel even more imposing and powerful. A 135mm lens would heavily compress the background, turning the sky into a flat plane of color and creating extreme subject isolation, more akin to a high-fashion editorial.
Lighting setup
- 1back · at eye level · far
- 2fill · below · near
1.Key / Rim: Late Afternoon Sun
Positioned low in the sky, behind the subject and slightly to camera right. It acts as both the key light and a strong rim light.
This is a direct, hard light source. The goal is to get a bright, warm edge along the subject's hair, shoulder, and the side of their suit. No diffusion needed. The quality of this light is entirely dependent on timing the shoot for the last hour of daylight.
Recreate the look
Starting-point editing settings for each app. Fine-tune against your source image.
Apple Photos
- Warmth
- +25
- Tint
- +10
- Shadows
- +50
- Contrast
- -30
- Black Point
- +20
Introduces the golden hour feeling.
Adds a touch of magenta to neutralize greens.
Opens up detail on the subject's face and suit.
Softens the overall image and helps lift the blacks.
Creates the faded, filmic shadow look.
Equipment list
85mm f/1.4 or f/1.8 Prime Lens
Provides the ideal compression and subject isolation for this heroic portrait.
Budget option: 50mm f/1.8 lens or a kit lens at its maximum zoom.
View on AmazonCamera with Full Frame Sensor
Maximizes control over depth of field and captures a cleaner image in the dynamic lighting conditions.
Budget option: Any APS-C or Micro Four Thirds camera with manual controls.
View on Amazon4'x4' White Bounce Card (e.g., foam core or reflector)
To provide soft, low-level fill light on the subject's front side.
Budget option: A white bedsheet or a large piece of white cardboard.
View on AmazonLow Profile Tripod or Ground Spreader
Helps to get the camera extremely low to the ground and keep the frame stable.
Budget option: A beanbag or placing the camera directly on a camera bag on the ground.
View on Amazon
Creative direction
Art & staging
The location is critical: an open field with textured, dry grass or straw creates the foreground and world of the shot. The horizon line is kept very low in the frame to maximize the sky and emphasize the subject's height. Wardrobe is a light-toned, slightly oversized suit which catches the warm light beautifully and provides a clean silhouette. The subject is staged centrally, posed with a relaxed hand in the pocket, looking directly into the lens with a calm, powerful gaze.
Director's commentary
This shot is about creating an icon. The low angle, central framing, and direct eye contact establish the subject as a figure of immense strength and self-possession. They are not simply passing through this landscape; they own it. When directing the talent, ask for stillness and a grounded posture. The power comes from their presence, not from action. It's a moment of quiet confrontation with the viewer, a declaration of identity that needs no words. The simple, vast background ensures our entire focus is on their expression and stature.
On a budget
This look is very achievable on a small budget. The sun is your key light, so scheduling is your main tool. Use any camera with manual settings and a kit lens zoomed to its longest focal length. For fill, a large piece of white foam core from a craft store or even a white bedsheet held taut just out of frame will work perfectly as a bounce.