Ceeniq · Shot Blueprint
Medium wide · naturalistic lighting
July 12, 2026
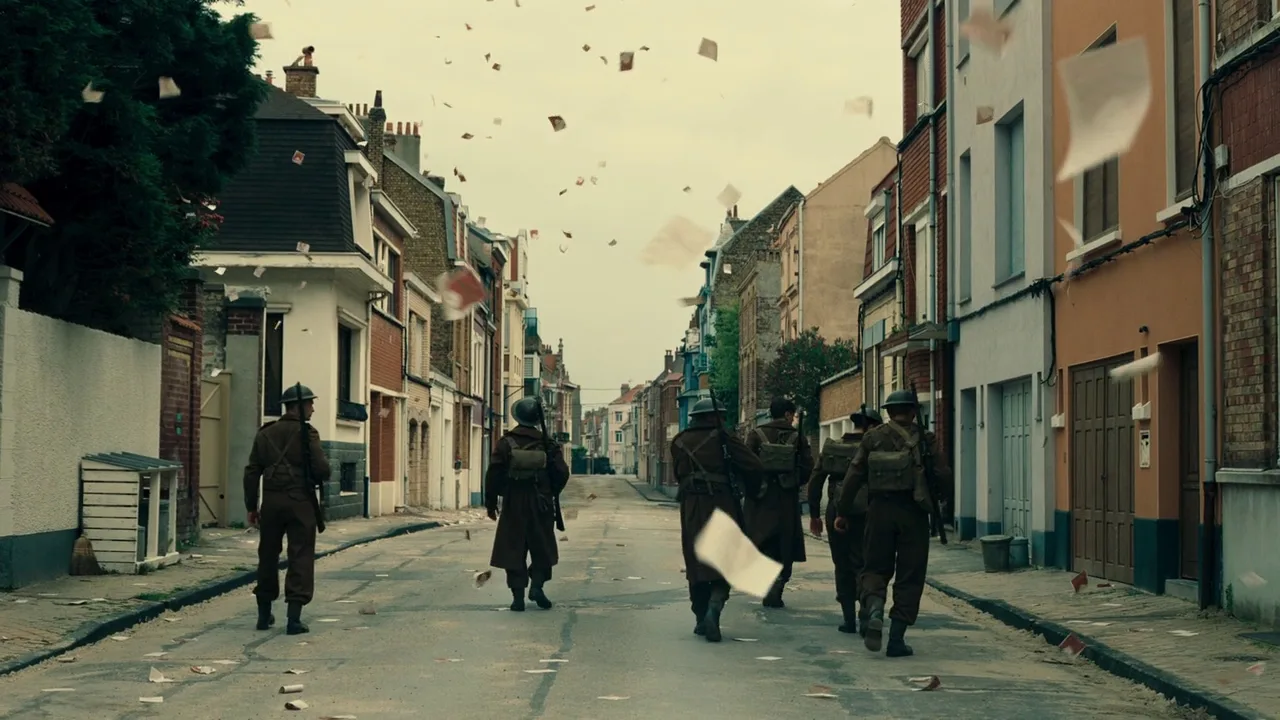
This shot effectively conveys a sense of desolation and weary retreat through its wide framing of soldiers moving through a deserted street under an overcast sky. The falling papers add a poignant, chaotic element that enhances the feeling of abandonment and loss. The muted color palette and flat lighting contribute to the somber mood.
This is a naturalistic tableau shot, designed to feel observational and desolate. The key is using a massive, soft overhead light source—either a real overcast sky or a huge silk—to create a flat, shadowless look. The color palette is heavily desaturated and shifted towards a grim, greenish-brown tone. The camera remains static, letting the soldiers' weary march away from us tell the story.
Camera setup
- Lens
- This feels like a standard focal length, likely a 40mm or 50mm on a large format sensor, which translates to about a 35mm on a Super 35 camera or a 50mm on full-frame. The goal is a natural field of view that doesn't distort the architecture but still feels wide enough to establish the environment. You want a lens with character, not something clinically sharp. An older Cooke S4 or Zeiss Super Speed would be perfect. For a budget option, a Rokinon or Sigma Art 50mm f/1.4 will do the job well.
- Position
- The camera is at chest height, about 4 to 5 feet off the ground, and placed dead center in the street. This creates strong, symmetrical leading lines that pull the eye into the frame. It's positioned far enough back to watch the soldiers walk a considerable distance, emphasizing their journey and the emptiness of the town.
- Settings
- Shoot on an overcast day. Your light will be flat, so you can open up a bit. Start at a T4 or T5.6 to hold focus on the soldiers while keeping the background architecture reasonably sharp. Set your shutter to a standard 180-degree angle (1/48 or 1/50 sec at 24fps) to get a natural motion blur on the falling papers. Keep the ISO at the camera's native setting, likely 400 or 800, as the overcast sky provides plenty of light.
- Alternatives
- A 28mm lens would widen the street, making the soldiers feel smaller and the environment more overwhelming, exaggerating the feeling of being lost. An 85mm lens would heavily compress the scene, making the buildings feel stacked on top of each other and creating a more claustrophobic, trapped feeling. The soldiers' forward progress would also seem much slower.
Lighting setup
- 1key · overhead · far
1.Key & Fill: Overcast Sky
Directly overhead, stretching across the entire scene. This is the ideal source.
The goal is extremely soft, non-directional light. An overcast day is your best production value. If shooting on a sunny day, you'd need a massive 40'x40' silk or grifflon overhead to replicate this flat, shadowless quality, which is a major undertaking.
2.Negative Fill (Optional)
Large 12x12 or 20x20 solids (blacks) positioned just out of frame on both sides of the street.
If the overcast sky is making everything too flat and robbing the buildings of all shape, you can use negative fill to subtly carve out some contrast along the edges of the frame. Use sparingly, as the intended look is intentionally low-contrast.
Recreate the look
Starting-point editing settings for each app. Fine-tune against your source image.
Apple Photos
- Highlights
- -30
- Shadows
- +50
- Contrast
- -30
- Black Point
- +20
- Saturation
- -70
Softens the bright, overcast sky.
Lifts the shadows for the faded, low-contrast look.
Flattens the overall image.
Ensures no part of the image is pure black.
The primary move to achieve the muted color palette.
Equipment list
Large Format Cinema Camera (e.g., Arri Alexa 65, Panavision DXL2)
Provides the immense detail and natural field of view seen in the original film, likely *Dunkirk*.
Budget option: Any full-frame mirrorless camera (e.g., Sony A7S III, Canon R5).
View on Amazon40-50mm T1.3-T2 Prime Lens
Captures a naturalistic perspective without distortion.
Budget option: A 'nifty fifty' 50mm f/1.8 lens.
View on AmazonHeavy Duty Tripod (e.g., O'Connor 2575D)
Ensures the shot is perfectly stable and locked off.
Budget option: Any sturdy photo tripod.
View on AmazonProp Leaflets
A key story element, used as a practical effect to fill the air.
Budget option: DIY aged paper or newsprint cut to size.
View on Amazon
Creative direction
Art & staging
The location is paramount. You need a narrow street with older, European-style row houses to create the leading lines. The street needs to be dressed to look abandoned: scattered debris, dirt, and of course, the leaflets. The falling papers are a practical effect. You'll need thousands of them dropped from rooftops or cranes positioned out of frame, timed to drift down as the soldiers walk through. The soldiers' blocking is simple: they walk away from camera in a loose, weary group, never looking back.
Director's commentary
This shot is about the quiet exhaustion of defeat. By placing the camera behind the soldiers and watching them retreat, we become observers of their anonymous, weary journey. They are moving away from us, into an uncertain future. The falling leaflets, a relic of a battle's propaganda, now feel like funeral confetti, underscoring the futility of their situation. I would direct the actors to walk with their shoulders slumped, carrying the weight of their gear and their loss. Their pace is not a march, but a shuffle. It's the rhythm of survival, not victory.
On a budget
Your best friend for this shot is Mother Nature. Wait for a heavily overcast day for free, perfect lighting. The location can be any older street that fits the aesthetic. The leaflets can be printed cheaply on newsprint and dropped by crew members hiding on balconies or ladders. Use a mirrorless camera on a tripod with a 50mm prime lens. The core elements are the composition and the grade, both of which are achievable on a small budget.