Ceeniq · Shot Blueprint
Medium wide · naturalistic lighting
July 13, 2026
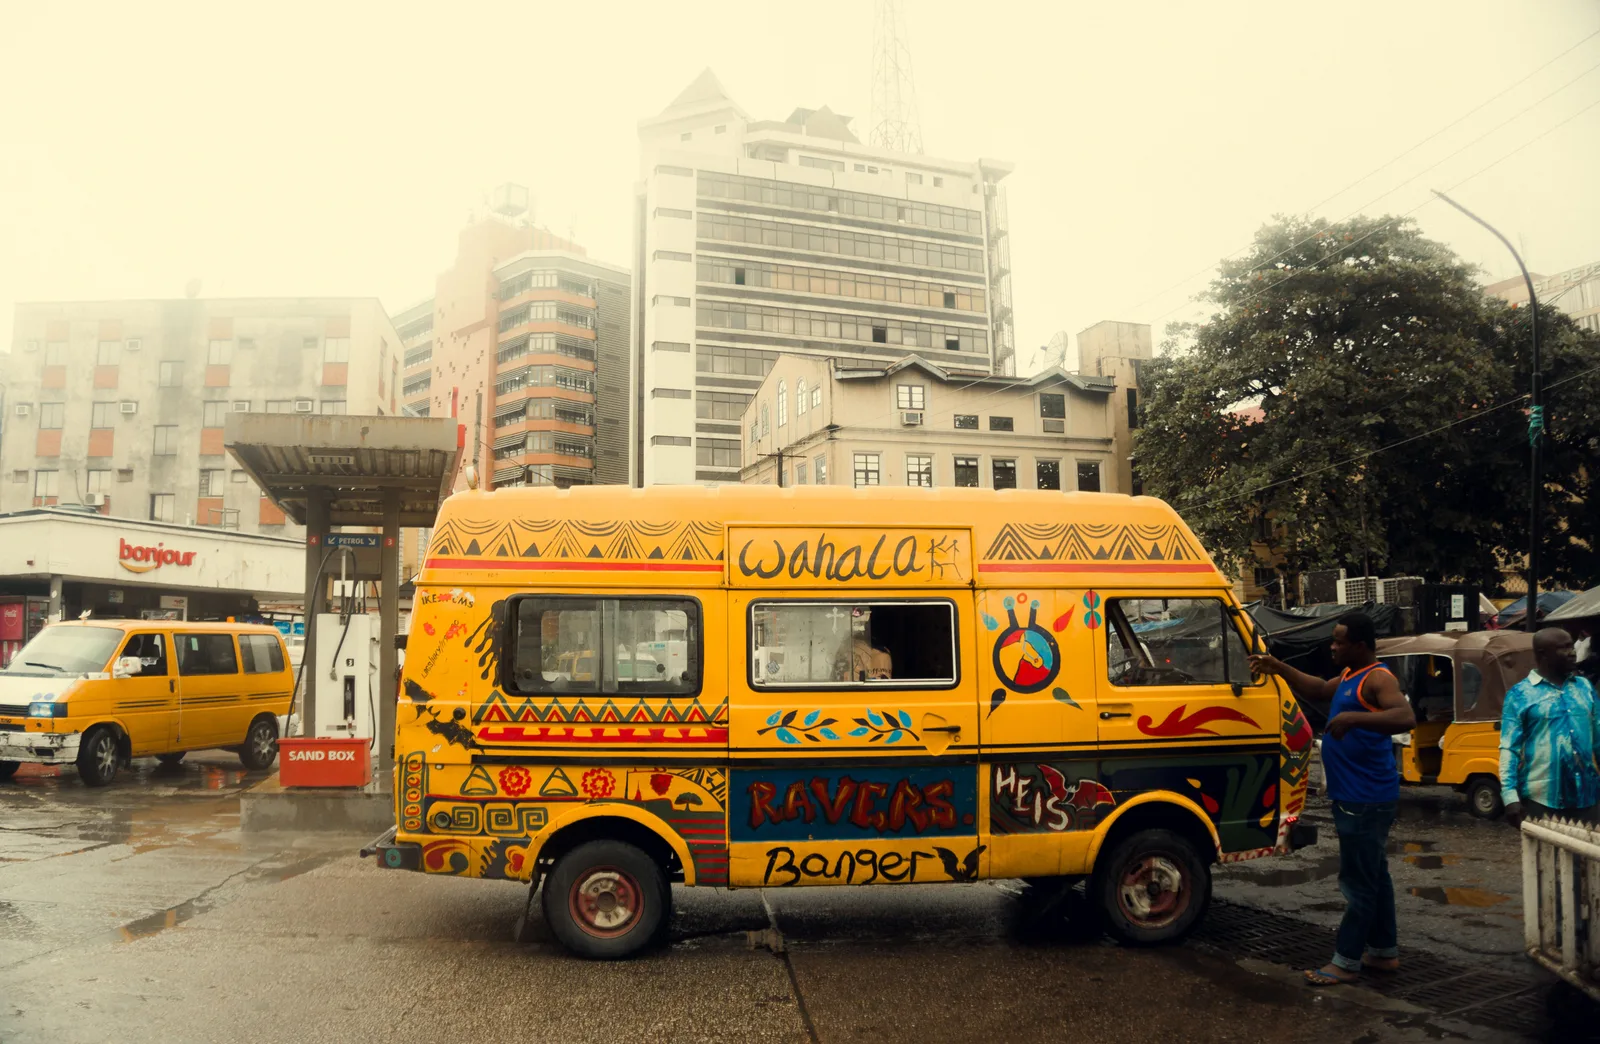
This shot captures an everyday urban scene, focusing on a brightly decorated yellow bus that pops against the muted, hazy city background. The soft, diffused lighting and natural framing create an authentic and grounded atmosphere. It works by using the vibrant bus as a clear subject while allowing the surrounding environment to tell a broader story of city life.
This is an atmospheric, observational shot that hinges on the contrast between a single, vibrant subject and a muted, hazy urban environment. The approach is naturalistic, relying on authentic weather conditions and a strong, stylized color grade to achieve its filmic, almost nostalgic quality. Success means embracing soft, flat light and then carving out the final look in post.
Camera setup
- Lens
- A 35mm prime lens on a full-frame sensor is the best choice here. It provides a natural, human-eye perspective that's wide enough to establish the environment without introducing distracting distortion. It feels like you're simply standing on the street corner. A good budget alternative is a standard 18-55mm kit lens set to around 35mm.
- Position
- The camera is positioned approximately 15-20 feet from the side of the bus, at chest height, about 4.5 feet off the ground. The camera is level and square to the subject, creating a stable, documentary-style composition. There is no dutch angle or dramatic perspective.
- Settings
- Shoot for a deep depth of field to keep the environmental details legible. Start at an aperture of f/8. On an overcast day, this will likely require an ISO of 400 or 800 to get a proper exposure. Use a shutter speed of at least 1/125s to prevent motion blur on the pedestrians. The lighting is flat, so you can expose for the mid-tones on the bus.
- Alternatives
- A 28mm lens would widen the view, making the bus feel more integrated into a larger, more imposing cityscape; it would add a bit more energy. A 50mm lens would tighten the frame, compressing the background and creating a slightly more formal, composed portrait of the vehicle. An 85mm lens would completely change the intent, isolating a specific detail of the bus and turning the background into an abstract blur of color.
Lighting setup
- 1key · overhead · far
1.Key: Overcast Sky
Directly overhead, spanning the entire scene. This is a massive, uncontrollable soft source.
This is the primary and defining light source. Do not add any other lights to the subject. The goal is to capture the flat, low-contrast look of a hazy day. The atmospheric conditions do the heavy lifting by wrapping light around every object and softening all shadows.
2.Atmosphere: Haze/Fog
Between the camera and the background buildings.
This is less a light source and more a light modifier. The haze is crucial for lowering the contrast of the background, separating it from the main subject, and blooming the highlights in the sky. If the weather is not cooperating, a haze machine will be necessary.
Recreate the look
Starting-point editing settings for each app. Fine-tune against your source image.
Apple Photos
- Warmth
- +65
- Highlights
- -30
- Shadows
- +75
- Black Point
- +20
- Contrast
- -40
Introduces the strong, dominant yellow cast.
Recovers some detail in the bright sky.
Lifts the dark areas to create the hazy, low-contrast feel.
Ensures no part of the image is pure black.
Flattens the overall image to match the soft lighting.
Equipment list
Full-Frame Mirrorless or DSLR Camera
Provides the sensor size and image quality needed to capture detail and handle the color grade.
Budget option: Any APS-C or Micro Four Thirds camera.
View on Amazon35mm f/1.8 or f/2 Prime Lens
Delivers the classic, naturalistic field of view for this style of observational shot.
Budget option: 18-55mm kit lens.
View on AmazonHaze Machine (e.g., Hazer in a Can)
To create the atmospheric haze if not present naturally, which is critical for depth separation and the soft look.
Budget option: Waiting for a foggy or hazy morning.
View on AmazonTripod
Ensures a perfectly stable, locked-off frame, reinforcing the observational, tableau style.
Budget option: A steady hand or resting the camera on a stable surface.
View on Amazon
Creative direction
Art & staging
The hero subject is the brightly painted bus; it must feel like a unique, living part of the city. Staging it against a backdrop of muted, concrete buildings creates immediate visual contrast. The ground should be wet down to add reflections and texture, preventing the asphalt from becoming a flat, black void. Background action, including other vehicles and pedestrians, should be present but not distracting, adding to the slice-of-life realism.
Director's commentary
This shot isn't about a specific plot point; it's about establishing a world. We're telling the audience that this place is vibrant, real, and has its own unique character, symbolized by the art on the bus. The static frame allows the viewer's eye to wander, absorbing the atmosphere. I would direct the actor by the bus to perform a simple, mundane task—wiping a window, waiting for a passenger—so they feel like a natural part of the scene, not a performer. The goal is authenticity, capturing a moment that feels found, not staged.
On a budget
The most important element is free: shoot on a genuinely overcast, foggy, or hazy day. Use a smartphone or a camera with a basic kit lens. Find the most colorful vehicle or mural in your area and frame it similarly. Wet the street with a few buckets of water. For the grade, use a mobile app like VSCO or Tezza and find a preset that gives a warm, vintage look with lifted blacks, then adjust the intensity.