Ceeniq · Shot Blueprint
Medium · stylized lighting
July 15, 2026
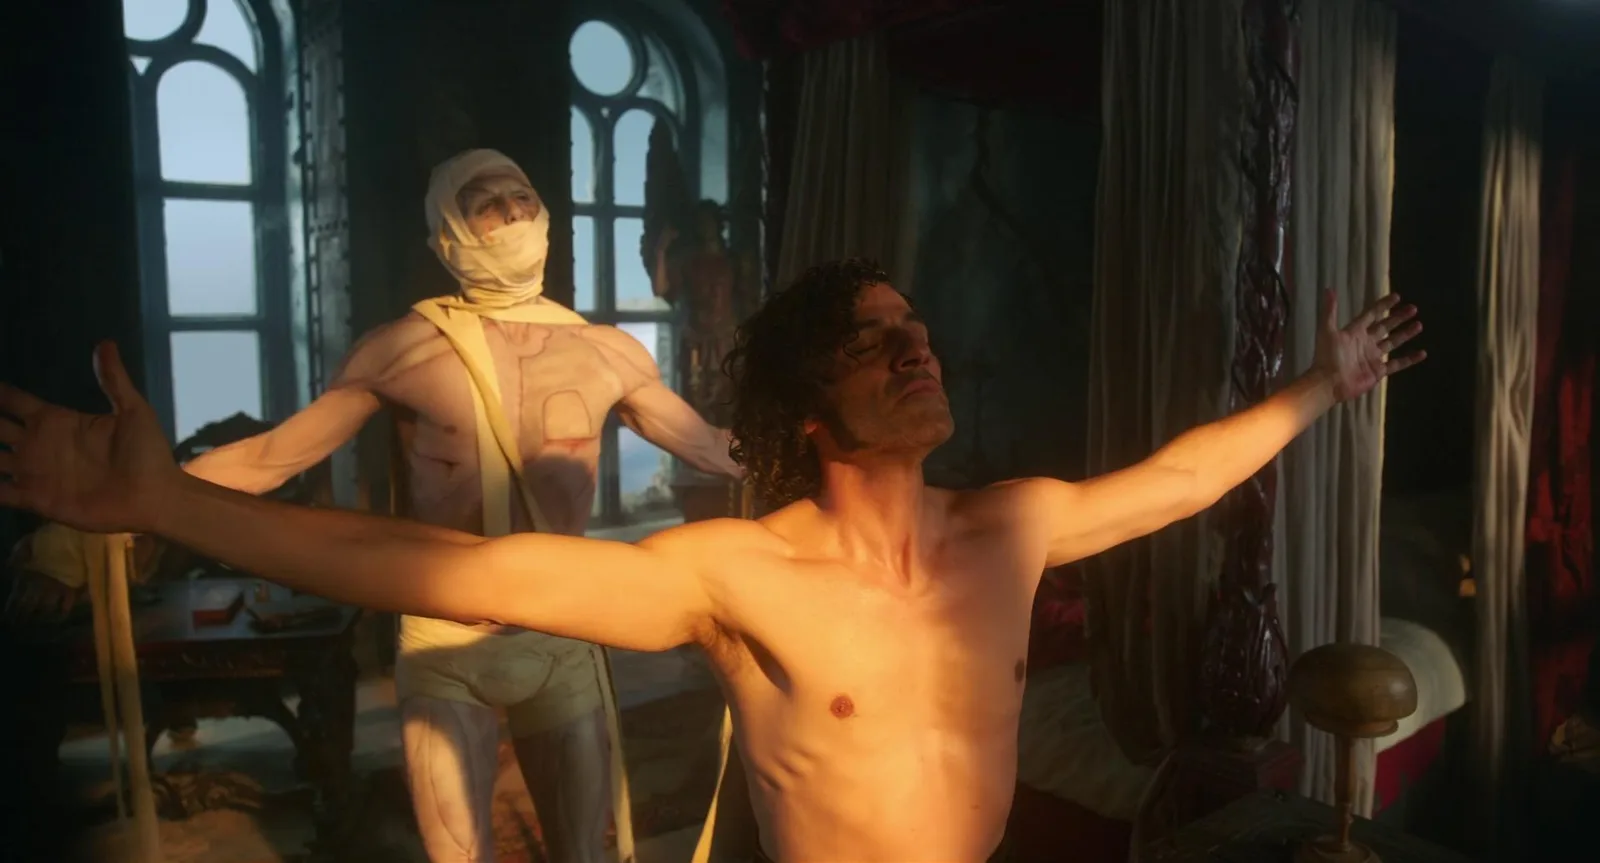
This shot captures a moment of intense vulnerability and ecstasy, with a central figure bathed in warm light and arms outstretched, framed against a mysterious, bandaged figure and cool window light. The dramatic contrast and powerful pose create a visually striking and emotionally charged image, hinting at a ritualistic or transformative event.
This is a stylized, high-contrast medium shot that creates a theatrical, almost painterly tableau. The core idea is the dramatic interplay between a hard, warm key light sculpting the foreground subject and a soft, cool ambient light from a background window. The look relies on careful light placement, negative fill to deepen shadows, and a color grade that pushes the warm/cool separation.
Camera setup
- Lens
- A 35mm prime lens on a Super 35 sensor is the likely choice here. This focal length is wide enough to capture the subject's full arm span in a medium shot without significant distortion, keeping the viewer immersed in the space. A lens with good flare control is important given the bright background. For a more budget-conscious setup, a 24-70mm f/2.8 zoom lens would offer flexibility, or a 'nifty fifty' (50mm f/1.8) on a full-frame camera would provide a similar field of view and depth of field.
- Position
- The camera is positioned at about chest height, roughly 8-10 feet from the main subject. This slightly low angle gives the character a sense of power and vulnerability. The camera is framed straight-on to the subject's pose, creating a symmetrical, confrontational composition that places the viewer directly in the scene.
- Settings
- Start with an aperture around T2.8 or T4. This provides a shallow enough depth of field to soften the background figure and curtains, but keeps enough of the main subject's body in focus. Shutter speed will be 1/48th or 1/50th of a second for a standard 180-degree shutter at 24fps. Set the camera to its native ISO, likely 800. You will need ND filters on the lens (or gels on the window) to control the bright background light while maintaining your desired aperture.
- Alternatives
- A 50mm lens would create a more compressed look, bringing the background figure closer and creating a more intimate, claustrophobic feel. A wider 24mm lens would exaggerate the outstretched arms, making the gesture feel even more grand, while pushing the background further away and revealing more of the environment. An 85mm would create a very different shot, isolating the character's face and torso in a tight portrait and rendering the background as an abstract blur, focusing solely on his emotional state.
Lighting setup
- 1key · above · medium
- 2ambient · at eye level · far
- 3fill · at eye level · near
1.
Recreate the look
Starting-point editing settings for each app. Fine-tune against your source image.
Apple Photos
- Exposure
- -0.15
- Highlights
- -40
- Shadows
- +15
- Contrast
- +25
- Black Point
- +20
Slightly darken the overall image to enrich the shadows.
Pull back the bright areas in the window and on the skin.
Lift the darkest parts just enough to see detail, before crushing them with black point.
Increase the overall separation between light and dark.
Crush the deepest shadows to a rich black.
Equipment list
ARRI Alexa Mini or similar cinema camera
To capture a wide dynamic range and provide a robust image for color grading.
Budget option: Blackmagic Pocket Cinema Camera 6K
View on Amazon35mm T1.9 Prime Lens
Provides the ideal field of view and shallow depth of field for this composition.
Budget option: Sigma 18-35mm f/1.8 Art lens
View on AmazonARRI T2 2K Tungsten Fresnel
Creates the hard, warm key light with crisp shadows.
Budget option: Aputure LS 600d Pro with F10 Fresnel
View on AmazonARRI M18 1.8K HMI
Powerful daylight source to blast through the window for the cool ambient light.
Budget option: Aputure LS 600x Pro with diffusion
View on Amazon
Creative direction
Art & staging
The main subject is staged centrally, with his arms outstretched in a cruciform pose, immediately conveying a sense of sacrifice or ecstasy. The secondary, bandaged figure is placed in the mid-ground behind him and to the left, creating depth and an unsettling narrative question. The room is dressed with heavy, dark, ornate furniture and drapes—note the carved bedpost and dark curtains. This rich, textured background absorbs light and adds to the Gothic, historical mood. A light haze or smoke should be used in the room to catch the light from the window and give the atmosphere a physical presence.
Director's commentary
This shot is designed to be an emotional climax or a moment of profound transformation. The actor's pose is the centerpiece; it must communicate a complete surrender to the moment, whether it's one of pain, ecstasy, or rebirth. Direct the actor to feel the light on their skin, to push their arms out as if embracing the entire world or holding it at bay. The second figure must remain perfectly still, an object of mystery. Their stillness is what creates the tension. Is this figure a creator, a tormentor, or a passive observer? The ambiguity is the point. The shot captures a character at their most vulnerable and powerful, caught between two opposing forces represented by the light.
On a budget
For the key light, use an affordable COB LED light with a Fresnel attachment and a CTO gel. The background ambient light can be a real window on an overcast day; you might need to wait for the right light. If shooting at night, a couple of cheap LED panels gelled with CTB and diffused through a shower curtain will work. Use a black bedsheet or a large piece of black foam core for negative fill. A small, inexpensive fog machine can create the haze; use it sparingly and let it settle.