Ceeniq · Shot Blueprint
Medium close-up · stylized lighting
July 21, 2026
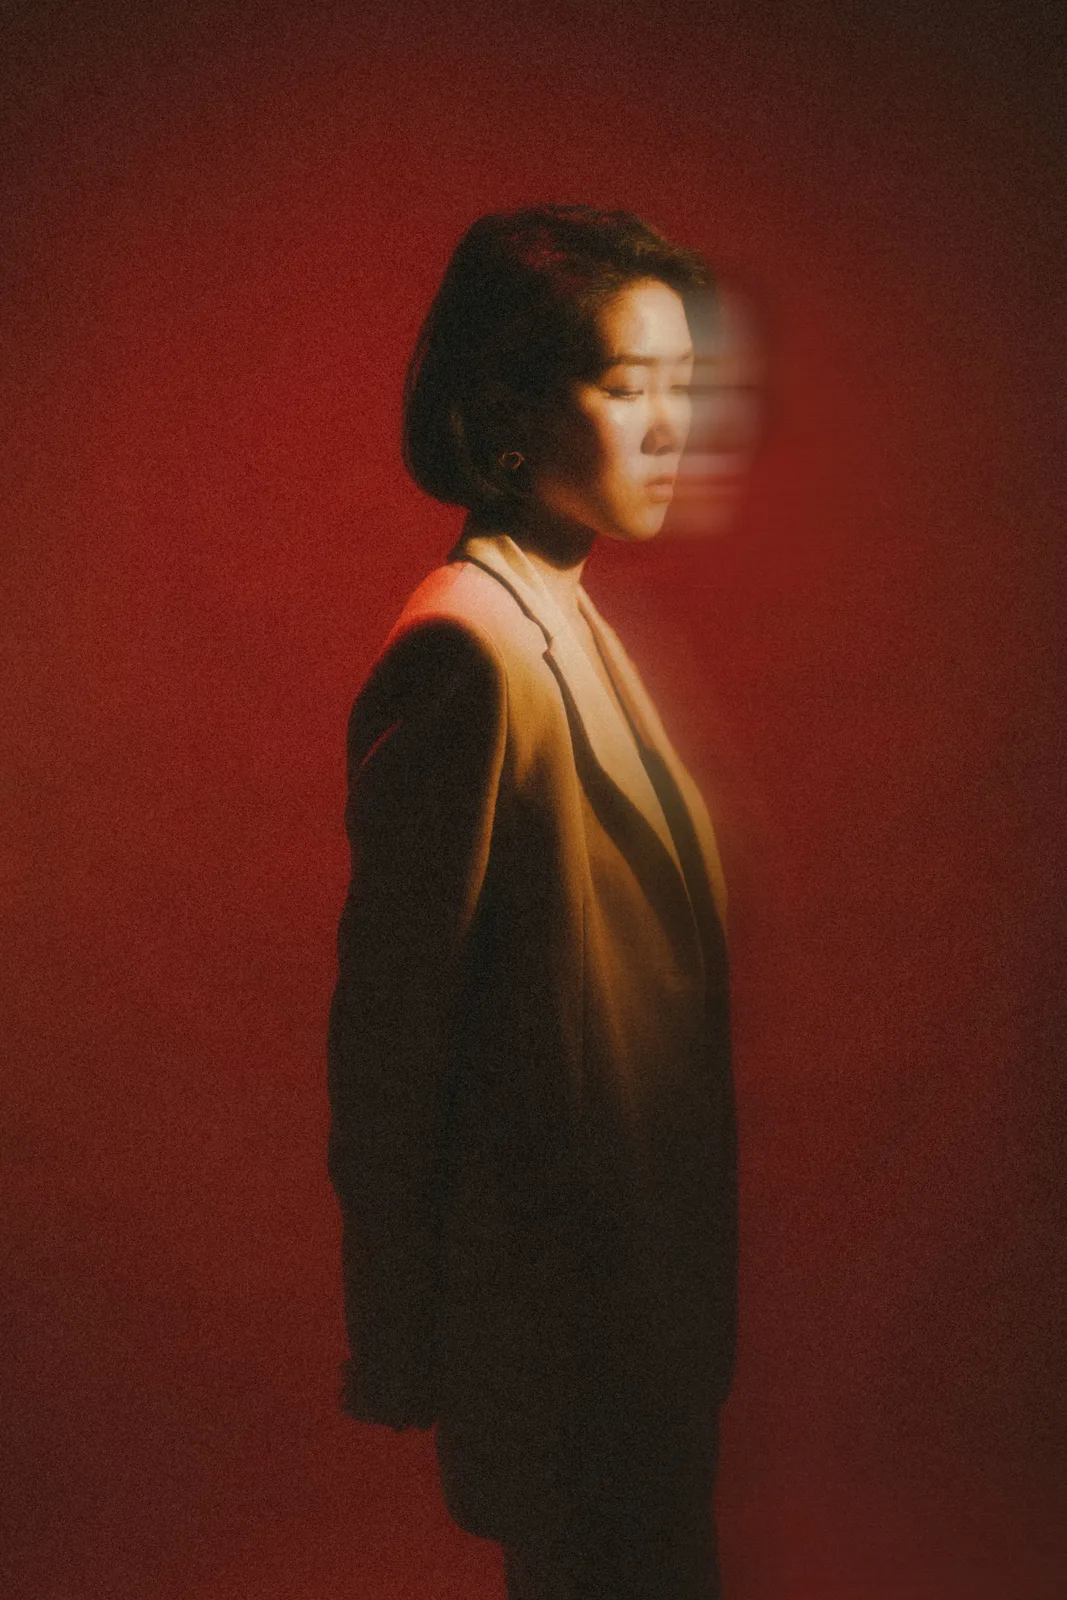
This shot masterfully blends a strong color palette with subtle motion blur to create a pensive and enigmatic portrait. The subject, framed against a rich red background, appears to be in a moment of introspection, with the gentle blur suggesting a fleeting thought or a dreamlike state. The precise lighting sculpts the face while maintaining a soft, painterly feel.
This is an impressionistic and moody portrait that marries a slow shutter speed with a strong, monochromatic color world. The key is balancing the intentional motion blur, which suggests an internal state, with a soft, sculpting key light. The background is not just red, but an active, luminous element of the composition.
Camera setup
- Lens
- This feels like a classic portrait lens, likely an 85mm T1.8 or T2.1. An 85mm provides beautiful compression, flattering the subject's features while separating her from the background. It allows you to be at a comfortable working distance. For a cheaper setup, a modern 85mm f/1.8 prime from any manufacturer will do the job perfectly. A 'nifty fifty' (50mm f/1.8) is an even more affordable option.
- Position
- The camera is positioned for a medium close-up, about 5 to 6 feet from the subject. It is at her chest height, angled straight on to capture her profile as she turns. This level angle feels grounded and intimate, not observational or imposing. The subject is framed on the left third, leaving the right two thirds as negative space.
- Settings
- The motion blur is the central technical element. I'd start with a shutter speed of around 1/15s. To control this, you need a tripod for a steady base. The blur comes from the subject's slow head turn or a very slow pan with the camera. Set your aperture to around T4 or T5.6 to keep enough of the face acceptably sharp through the motion. ISO should be at the camera's base (100-800) and you'll likely need a 0.6 or 0.9 ND filter to achieve this exposure in a lit studio.
- Alternatives
- A 50mm f/1.4 would place you closer to the subject, creating a more intimate but less compressed look; the background would feel larger. A 135mm f/2.8 would further compress the image, making the background a soft, abstract field of red and isolating the subject even more, creating a feeling of elegant detachment. A 35mm f/2 would require you to be very close, which would introduce some perspective distortion and create a much more raw, immediate feeling.
Lighting setup
- 1key · above · medium
- 2background · at eye level · far
- 3fill · at eye level · medium
1.
Recreate the look
Starting-point editing settings for each app. Fine-tune against your source image.
Apple Photos
- Warmth
- +70
- Tint
- +25
- Exposure
- -0.15
- Shadows
- +40
- Black Point
- +20
Creates the foundational warm, reddish cast.
Pushes the warmth from orange towards a deeper red/magenta.
Slightly darkens the overall image for mood.
Lifts the shadows to soften them and reveal grain.
Re-establishes a deep black point for contrast after lifting shadows.
Equipment list
85mm T1.8 Prime Lens
Provides portrait compression and subject separation.
Budget option: 50mm f/1.8 prime lens
View on Amazon6x6' or larger Diffusion Frame (e.g., Magic Cloth)
Creates the large, soft key light source.
Budget option: Large white bedsheet or a bounce board
View on Amazon650W+ Light Source
To punch through the large diffusion for the key, and a second for the background.
Budget option: Aputure 300d or similar LED, or a household lamp
View on AmazonHeavy Duty Tripod with Fluid Head
To enable a stable shot with a slow shutter speed, and a smooth pan if needed.
Budget option: Any stable tripod, or a stack of books
View on Amazon
Creative direction
Art & staging
The subject is staged off-center, creating a powerful composition that uses negative space to convey a sense of introspection or longing. The background is a simple, textured seamless paper or a painted wall in a neutral grey, brought to life by the red light. Wardrobe is key: the neutral, slightly warm beige of the blazer contrasts with the saturated red background, helping the subject stand out without competing.
Director's commentary
This shot is not about what is happening externally, but what is happening internally. The frame isolates the subject in a sea of red, a color of passion, love, or danger. The motion blur is her consciousness slipping, a memory fading in or out. Direct your talent to close their eyes and perform a very slow, deliberate head turn as if searching for something in their mind. The goal is to capture a moment of vulnerability, the space between thoughts. The viewer should feel like they are witnessing a private, fleeting emotion.
On a budget
You can get surprisingly close on a low budget. Use a 50mm f/1.8 lens. For your key light, use a large window on an overcast day or bounce a cheap LED panel into a white bead board. For the background, hang a red bedsheet or blanket and light it with any small lamp you have, covering it with red theatrical gel or even a red plastic folder. Set your camera on a table or stack of books if you don't have a tripod, and add the grain in post using your editing software's built-in tools.