Ceeniq · Shot Blueprint
Medium close-up · stylized lighting
July 13, 2026
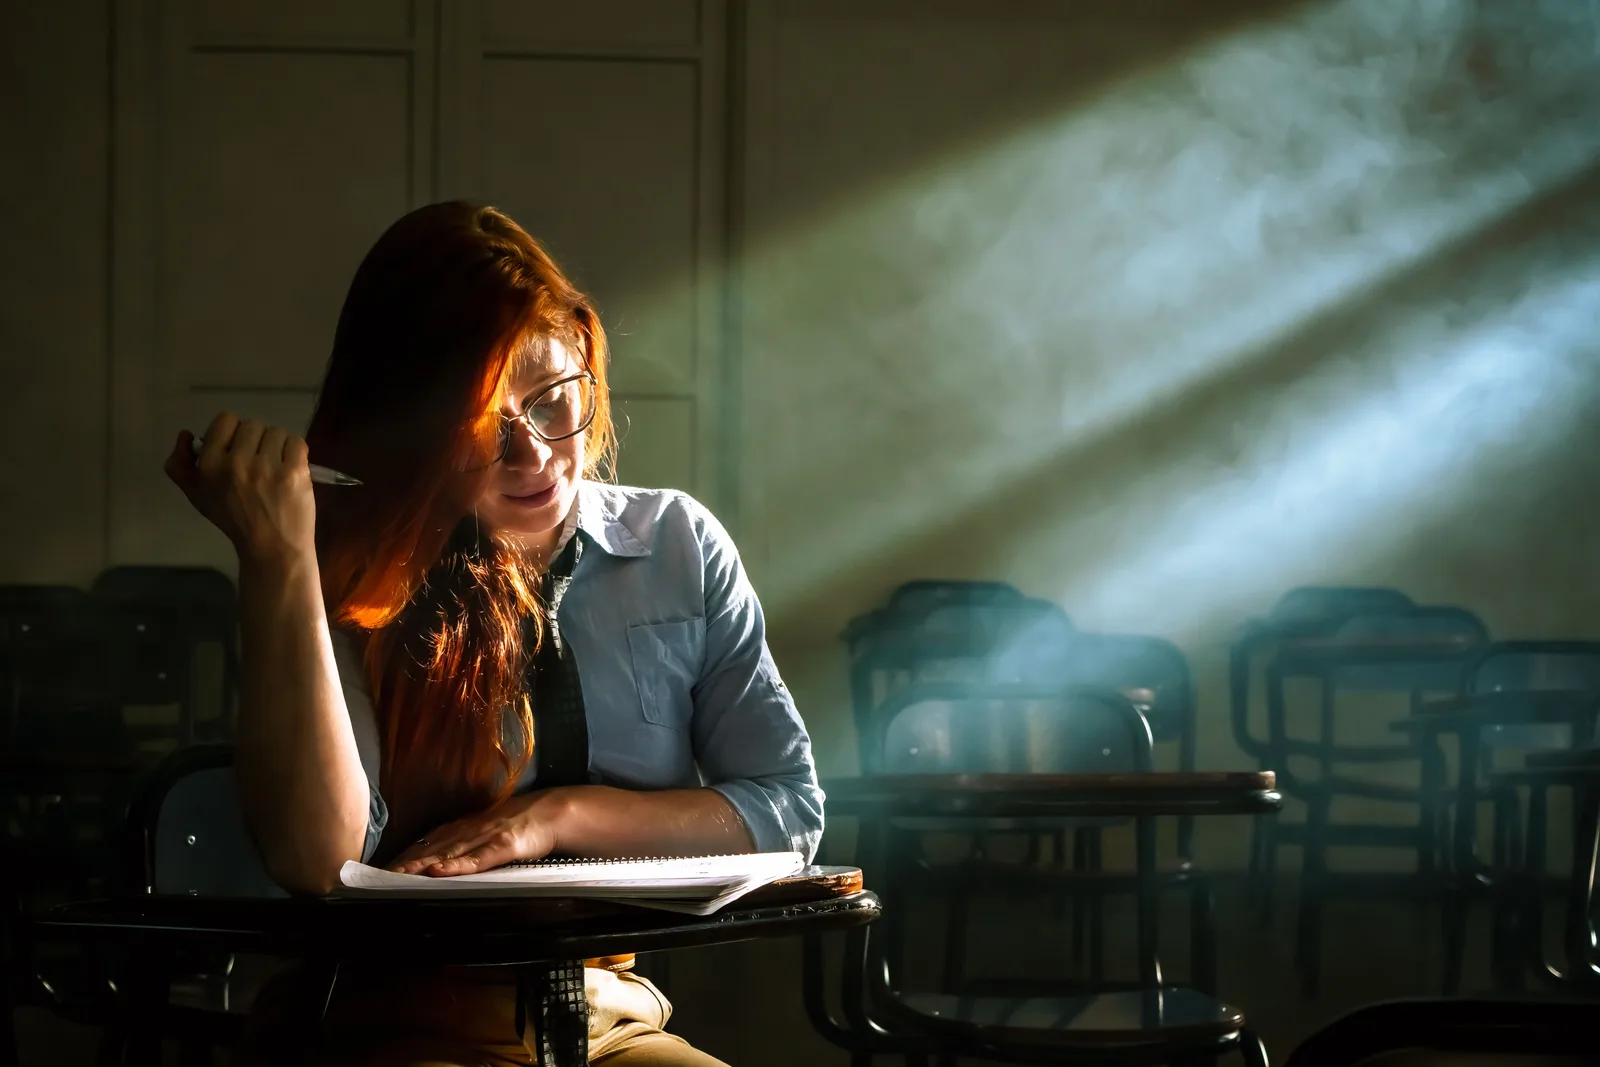
This shot masterfully uses dramatic lighting to create a pensive and atmospheric mood around the subject. A strong shaft of light cuts through haze, isolating the student and drawing the viewer's eye to her focused expression. The high contrast and limited color palette effectively convey a sense of introspection and perhaps solitude.
This is a dramatic, high-contrast character shot defined by its lighting. The core idea is to use a single, hard light source punched through atmospheric haze to create a tangible beam of light. This shaft of light isolates the subject, models her features with a strong rim, and creates a pensive, focused mood. The rest of the frame falls into deep shadow, concentrating all attention on her moment of study.
Camera setup
- Lens
- An 85mm prime lens on a full-frame sensor is a strong choice. It provides enough compression to soften the background and isolate the subject without feeling excessively tight or voyeuristic. The focal length creates a pleasing portrait with natural-feeling perspective. For a more budget-conscious setup, a 50mm f/1.8 lens stopped down to f/2.8 will get you very close, though with slightly less background compression.
- Position
- The camera is positioned at the subject's eye level, about 8-10 feet away to achieve this medium shot framing. It's placed slightly to her left, looking across her. The composition follows the rule of thirds, placing her on the left vertical third of the frame, leaving the right two-thirds for the dramatic light and negative space.
- Settings
- Start with an aperture around f/2.8 or f/4. This gives you a shallow enough depth of field to soften the background desks but keeps her face and notebook acceptably sharp. With a powerful key light, keep your ISO at its native base (e.g., ISO 100-400) to ensure clean shadows. Set the shutter speed to 1/50th of a second (for 24fps filming). You may need a 0.6 or 0.9 ND filter on the lens if your light is too bright to allow for the desired aperture.
- Alternatives
- A 50mm lens would create a more inclusive feel, showing more of the classroom and making the audience feel closer to the subject's space. A 135mm lens would greatly compress the background, turning the desks into an abstract pattern and creating a much more intimate, voyeuristic portrait of the student. A 35mm lens would change the shot dramatically into an environmental portrait, where the empty classroom becomes as much the subject as the student herself, emphasizing her isolation.
Lighting setup
- 1key · overhead · medium
1.Key Light: Hard Spot or Fresnel
Positioned high, up and to the camera's right, and slightly behind the subject. It should be angled down at about 45 degrees, raking across her hair, her right shoulder, and the desk. The light source is coming through some kind of breakup pattern, like a cucoloris (cookie) or even just the slats of a window blind, to create the distinct diagonal shafts.
This is the only significant light source. It should be a hard, focusable light like an HMI, a Leko, or a powerful LED with a Fresnel attachment. The hardness is critical for creating defined light beams in the haze. Don't use any diffusion on this light.
2.Atmosphere: Hazer
Recreate the look
Starting-point editing settings for each app. Fine-tune against your source image.
Apple Photos
- Exposure
- -0.15
- Highlights
- -30
- Shadows
- +15
- Black Point
- +20
- Warmth
- +25
Slightly darken the overall image to enrich the shadows.
Control the intensity of the light on her hair and paper.
Lift the darkest areas just enough to retain some detail.
Crush the blacks to re-establish a deep, high-contrast look.
Introduce the dominant warm tone, especially in the highlights.
Equipment list
Aputure LS 600d Pro with F10 Fresnel
To provide a powerful, hard, focusable key light that can be shaped to create distinct beams.
Budget option: Godox SL-60W or a hardware store work light.
View on AmazonHazer (e.g., Hazebase Pro)
To create a fine, consistent atmospheric haze that makes the light beams visible and adds texture.
Budget option: Party store fog machine, used sparingly.
View on AmazonCucoloris ('Cookie') or Large Flag
To create the striped pattern in the key light, mimicking light through window blinds.
Budget option: A large piece of cardboard with slots cut into it.
View on Amazon4x4 Floppy (Negative Fill)
To absorb bounced light and ensure the shadows on the fill side remain deep and dramatic.
Budget option: Black foam core or a heavy black blanket.
View on Amazon
Creative direction
Art & staging
The subject is staged on the left side of the frame, creating a strong asymmetrical composition that feels balanced by the weight of the light on the right. She is absorbed in her work, looking down at her notebook, which grounds the shot in a narrative context. The background is composed of empty classroom desks, kept in shadow and out of focus. Their repeating forms add depth and a sense of place without distracting from the subject. Her red hair is a key element, catching the warm light beautifully and providing a powerful point of color contrast against the cooler, desaturated environment.
Director's commentary
This shot is about capturing a moment of profound focus and isolation. We're witnessing a private world of thought. The light isn't just illumination; it's a visual metaphor for inspiration, a breakthrough, or the heavy weight of study. I would direct the actor to keep her movements minimal and contained. The story is told in the slight furrow of her brow, the way she holds her pen, the subtle shift in her posture. She should be unaware of the camera, lost in her own world. The empty desks surrounding her aren't just a location; they represent the absence of others, highlighting her solitary journey.
On a budget
You don't need an HMI for this. A single, cheap LED spotlight (like a Godox SL-60W) or even a powerful work light from a hardware store can serve as the key. Create the light shafts by cutting stripes into a large piece of cardboard and placing it in front of your light source. Use a cheap party fog machine for atmosphere. For negative fill, a black bedsheet or a piece of foam core painted black works perfectly. Shoot in a dark garage or basement to control the ambient light.