Ceeniq · Shot Blueprint
Medium close-up · stylized lighting
July 12, 2026
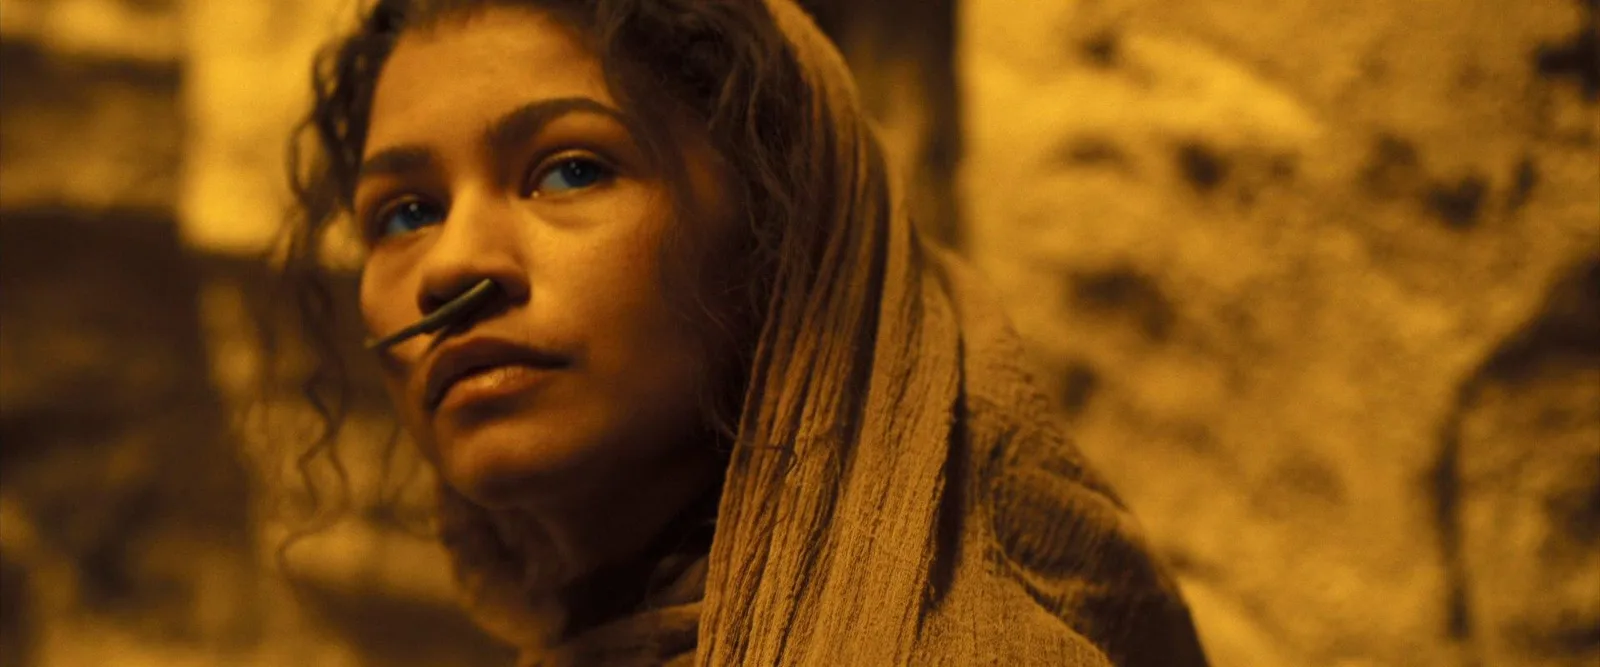
This is a dramatic medium close-up of a character, dominated by warm, golden tones that are sharply contrasted by her striking blue eyes. The hard, directional lighting emphasizes her intense gaze and the textures of her clothing and the environment, creating a sense of focus and determination.
This is a dramatic, low-key portrait designed to isolate the subject and her intense gaze. The look hinges on a single, hard key light creating high contrast, a telephoto lens for compression and shallow depth of field, and a heavy monochromatic color grade that punches the subject's blue eyes as the only point of color contrast.
Camera setup
- Lens
- An 85mm or 100mm prime lens on a full-frame sensor. This focal length provides flattering compression on the subject's features and allows the background to fall into a soft, abstract texture. The original was likely shot on a large-format camera with custom anamorphic lenses, but a spherical 85mm at T2.8 will achieve a similar depth and isolation. For a tighter budget, a Samyang or Rokinon 85mm T1.5 is a solid choice.
- Position
- The camera is positioned about 6-8 feet from the subject, at roughly chest height, with a slight upward tilt. This low angle gives the character a sense of strength and importance. She is framed on the right third, looking across the frame into the negative space on the left.
- Settings
- Start with your aperture around T2.8 to T4. This will provide a shallow depth of field to separate her from the background while keeping her entire face in critical focus. With a 180-degree shutter, your shutter speed would be 1/48s or 1/50s for 24fps filming. Set your camera to its native ISO, likely around 800, and adjust your lighting intensity or use ND filters to achieve the correct exposure at your desired aperture.
- Alternatives
- A 50mm lens would create a more immediate and slightly distorted feel, making the audience feel closer to her but losing some of the flattering compression. A 135mm lens would further compress the image, making the background an even softer, more abstract plane and isolating her face completely, which could feel more observational and distant. An anamorphic lens (like a 40mm or 60mm) would introduce oval bokeh and horizontal flares, bringing the look closer to the specific cinematic language of the film.
Lighting setup
- 1key · above · medium
- 2background · at eye level · far
1.Key: Hard Light Source
Positioned high and to the camera's right, about 45 degrees up from the subject's eyeline and 45 degrees to the side. This creates the distinct shadow under her nose (a touch of Rembrandt lighting) and defines her cheekbone.
Use a fresnel fixture or an open-faced LED with barn doors to create a hard, focused beam. Do not use any diffusion. The goal is defined shadows and texture. This light should be gelled with a full CTO (Color Temperature Orange) or set to around 3000K if it's an LED.
Recreate the look
Starting-point editing settings for each app. Fine-tune against your source image.
Apple Photos
- Warmth
- +80
- Exposure
- -0.15
- Contrast
- +25
- Shadows
- -30
- Black Point
- +15
Establishes the dominant golden-orange color cast.
Slightly darkens the overall image for a low-key feel.
Increases the separation between light and shadow.
Deepens the shadow areas, enhancing the dramatic lighting.
Crushes the darkest parts of the image into a rich brown-black.
Equipment list
Aputure LS 300d II with Fresnel 2X
To provide a powerful, hard, and easily shapeable key light.
Budget option: Godox SL-60W or a tungsten fresnel.
View on Amazon85mm T1.5 Cine Prime Lens
Achieves the flattering compression and shallow depth of field.
Budget option: Rokinon/Samyang 85mm T1.5 or a vintage 85mm photo lens with an adapter.
View on Amazon4x4 Solid Floppy Flag
Crucial negative fill to absorb light and create deep shadows.
Budget option: A 4x4 sheet of black foam core or a black blanket hung from a stand.
View on AmazonARRI Alexa Mini LF
A large-format sensor for shallow depth of field and excellent dynamic range.
Budget option: Blackmagic Pocket Cinema Camera 6K Pro.
View on Amazon
Creative direction
Art & staging
The subject is placed deliberately off-center to create tension and visual interest. The background should be a surface with rich, natural texture, like a rock wall, a concrete surface, or even a heavily wrinkled canvas drop cloth. The color should be a neutral or earthy tone (gray, beige, brown) that will take the warm light well. Her wardrobe consists of similarly textured, earth-toned fabrics that complement the environment and don't distract from her face.
Director's commentary
This shot is about stillness and inner vision. We are pushing into her consciousness. The framing puts her on the right, looking into an unseen space, implying she's focused on something beyond our view, perhaps a premonition or a strategic thought. The intensity comes from the eyes. The direction for the actor is simple: 'Don't show us anything, just see it. Let the thought live behind your eyes.' By holding the camera static and using a tight frame, we force the audience to lean in and study her face, searching for the meaning behind her unwavering gaze. The contrast of her luminous blue eyes against the oppressive warmth of the environment signals that she is unique, a force of change in this world.
On a budget
Use a single, inexpensive LED spotlight or even a clamp work light from a hardware store as your key light. You can shape it with black cardboard taped to the fixture. For the warm color, either buy a sheet of CTO gel or simply set your camera's white balance to a cool setting (like 'Fluorescent') and let the tungsten bulb render as very orange. Use a black t-shirt or piece of foam core for negative fill. The background can be a draped brown blanket. Most of this look can be achieved in a free color grading program like DaVinci Resolve.