Ceeniq · Shot Blueprint
Medium · naturalistic lighting
July 12, 2026
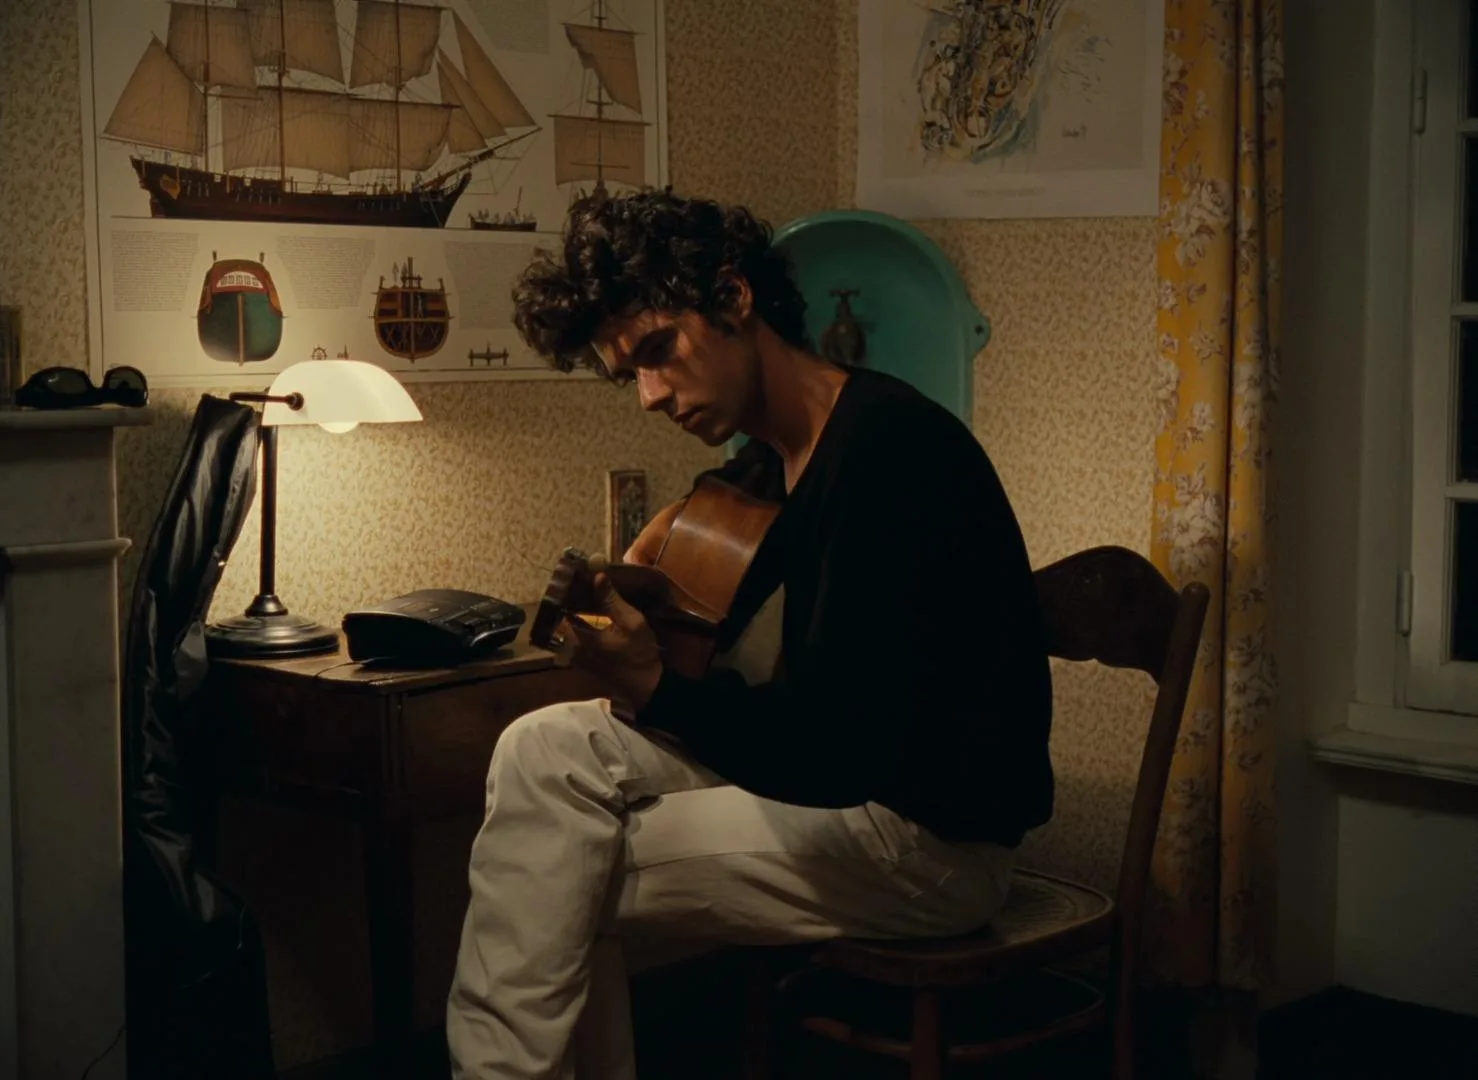
This shot captures an intimate moment of a musician engrossed in playing his guitar, lit by a warm desk lamp. The naturalistic lighting and gentle framing create a feeling of quiet contemplation and personal focus. It effectively draws the viewer into the character's private world.
This is a classic intimate portrait, grounded in motivated lighting from a practical source. The goal is to create a warm, quiet, and slightly nostalgic mood. We are observing a private moment, so the camera feels present but not intrusive. The key is balancing the warm practical light with just enough ambient fill to see into the shadows, and then finessing that look in the color grade.
Camera setup
- Lens
- A 50mm lens on a full-frame sensor is the right choice here. It provides a natural field of view that feels honest and observational, without the distortion of a wider lens or the heavy compression of a longer one. The background is soft but still legible, which is characteristic of a 50mm. For a more affordable option, any brand's 50mm f/1.8 prime will work perfectly. A vintage lens like a Helios 44-2 58mm could also add a pleasant, imperfect character.
- Position
- The camera is positioned about six to seven feet from the subject, at his chest height. The angle is straight on, not looking up or down at him. This creates a sense of being in the room with him on an equal level. The subject is framed to the right, following a loose rule of thirds, leaving negative space on the left to show his environment and give the composition breathing room.
- Settings
- Start with your aperture around T2.8. This gives a shallow enough depth of field to soften the background wallpaper while keeping the subject and his guitar sharp. Set your shutter to a standard 180-degree angle (1/48th or 1/50th of a second for 24fps). Your ISO will depend on your camera and the brightness of the lamp. I'd start at ISO 800 to get a bit of texture and then adjust. If the lamp is too bright and clipping, you'll need to add neutral density filters (ND) to the lens rather than stopping down the aperture and losing the soft background.
- Alternatives
- A 35mm lens would make the room feel larger and more present, slightly distorting the edges and bringing the background more into focus. It would feel more environmental and a little less focused on the character's internal state. An 85mm lens would do the opposite: it would compress the space, render the background as a soft wash of color and texture, and intensely isolate the subject. This would create a more classically beautiful portrait, but perhaps feel more staged and less like a candid moment.
Lighting setup
- 1key · below · near
- 2fill · above · far
- 3background · at eye level · far
1.
Recreate the look
Starting-point editing settings for each app. Fine-tune against your source image.
Apple Photos
- Warmth
- +35
- Highlights
- -40
- Shadows
- +50
- Black Point
- +15
- Contrast
- -20
Sets the overall warm, golden tone of the image.
Softens the bright lampshade and prevents clipping.
Lifts the dark areas to reveal detail, creating a softer contrast.
Prevents shadows from being pure black, giving a milky, filmic look.
Reduces the overall contrast for a gentler feel.
Equipment list
50mm Prime Lens
Provides a natural, non-distorted field of view that is flattering for a medium shot.
Budget option: Yongnuo 50mm f/1.8 or a vintage Pentax/Helios 50mm with an adapter.
View on AmazonPractical Desk Lamp with Dimmer
Acts as the key light, motivating the entire lighting scheme and creating a warm, soft source.
Budget option: Any household lamp with a warm bulb; control intensity by adding diffusion (baking paper) or moving it closer/further.
View on Amazon4'x4' Bounce Card (Foam Core)
To create a soft, ambient fill by bouncing the key light or another source into the shadows.
Budget option: A large piece of white poster board or a white bedsheet.
View on AmazonDigital Cinema Camera
To capture a high-quality image with good dynamic range and color science, allowing flexibility in the grade.
Budget option: Any mirrorless camera with manual controls and a flat picture profile (e.g., Sony A7S series, Blackmagic Pocket Cinema Camera).
Creative direction
Art & staging
The scene feels authentic and lived-in. The subject is positioned off-center, absorbed in his task. The background is crucial: the patterned wallpaper, the ship diagram, the yellow floral curtain, and the strange teal basin all add layers of character and visual interest without overwhelming the frame. These elements should feel personal to the character. The key is to create a controlled clutter that tells a story.
Director's commentary
This shot is about capturing a moment of quiet creation. We are a privileged observer in a personal space. The direction for the actor is simple: focus completely on the music. They should be unaware of the camera. Any blocking should feel natural, like how someone would actually sit to practice. The static frame holds the viewer's gaze, asking them to slow down and sink into the character's world. It's a shot that relies on the authenticity of the performance and the environment to draw its emotional power.
On a budget
This look is very budget-friendly. Use a real desk lamp with a warm, dimmable LED or tungsten bulb. For fill, a simple white foam board or even a bedsheet from the hardware store can bounce the lamplight back into the shadows. Shoot with an inexpensive 50mm f/1.8 lens wide open. The key is choosing a location with interesting textures on the wall; if you can't find one, hang up some posters or fabric yourself. The film grain can be added in post-production with most editing software.