Ceeniq · Shot Blueprint
Medium · stylized lighting
July 13, 2026
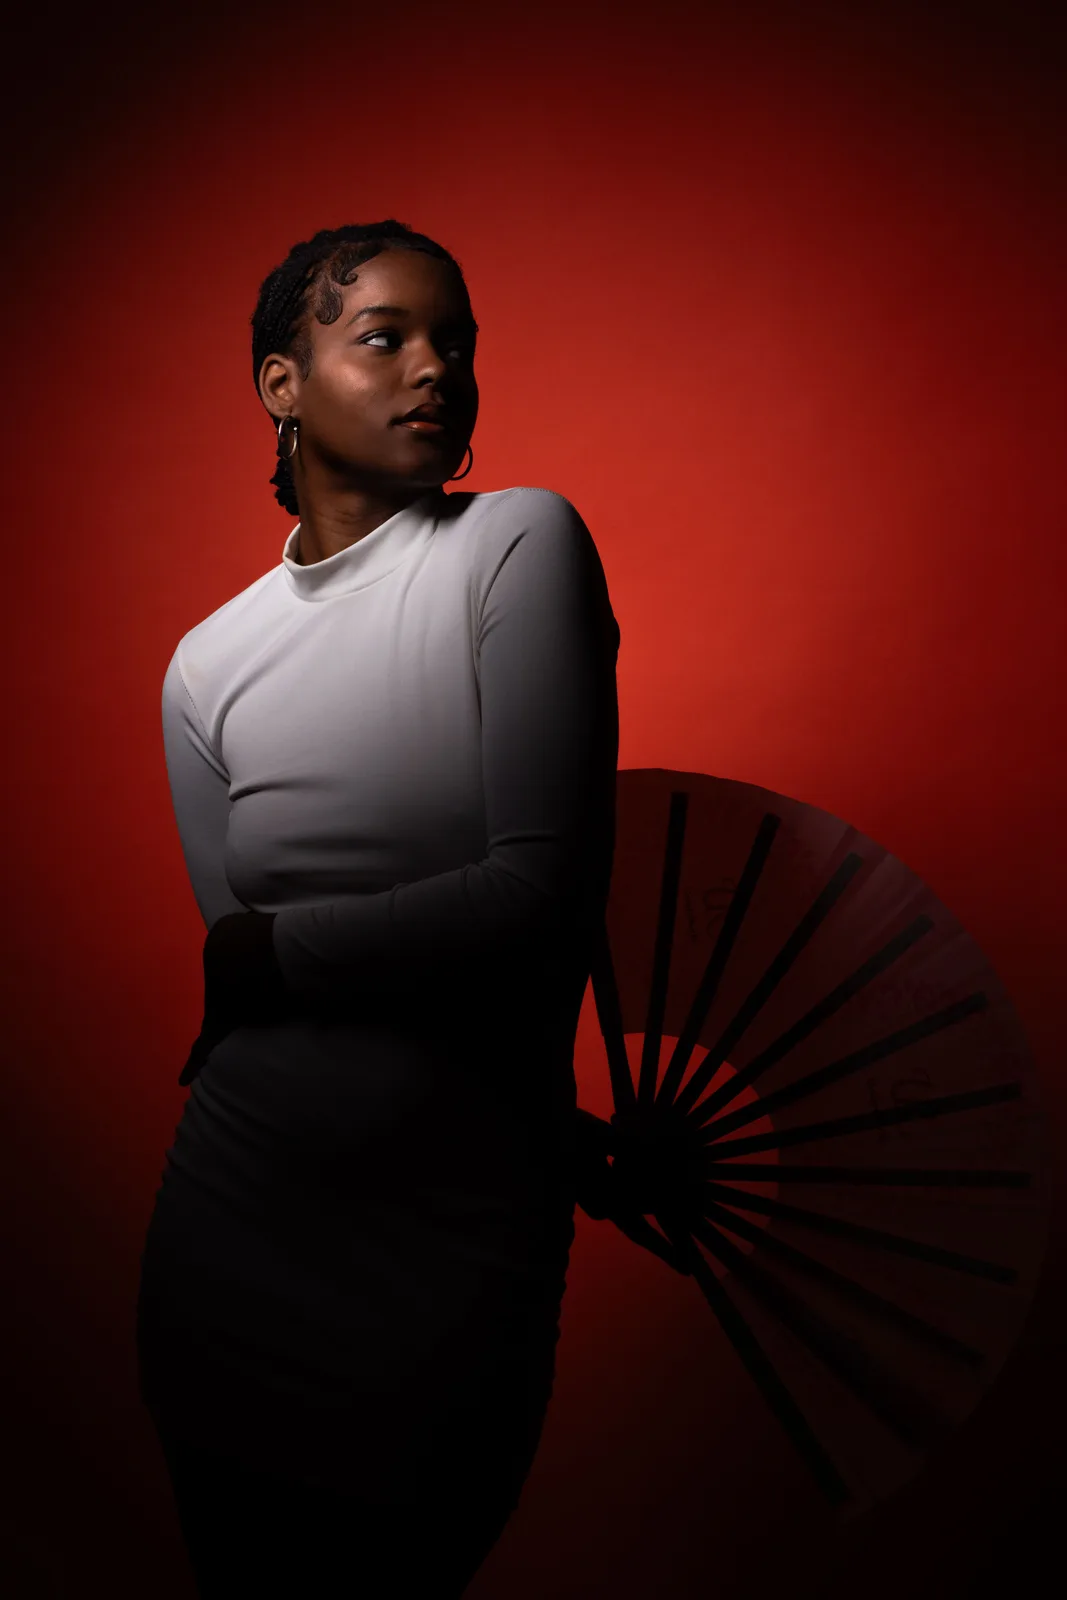
This is a striking portrait shot utilizing dramatic lighting and a bold color palette to create an elegant and mysterious mood. The hard key light sculpts the subject's face while silhouetting most of her body, drawing the viewer's eye to her expression and the contrasting textures.
This is a classic, high-drama studio portrait that hinges on lighting control and a bold color palette. The goal is to use a single, hard key light to sculpt the subject, creating deep shadows that conceal and reveal form. The background is lit separately to provide a vibrant, saturated red that isolates the subject.
Camera setup
- Lens
- An 85mm prime lens on a full-frame sensor is ideal. It provides flattering compression for portraiture, isolates the subject from the background, and allows a comfortable working distance. A quality 85mm f/1.8 is a great choice. For a budget setup, a 50mm f/1.8 will work, but you'll need to move closer, which will alter perspective slightly. A kit zoom lens set to its longest focal length (e.g., 55mm or 70mm) can also approximate the look.
- Position
- The camera is positioned approximately 6-8 feet from the subject, at her chest height. The angle is straight-on, not tilted up or down. This eye-level perspective creates a direct, grounded connection with the subject even as she looks away.
- Settings
- Start with your camera's base ISO, likely 100 or 200, for the cleanest image. Use an aperture of f/5.6 to f/8 to ensure sharp focus across the subject's face and shoulder. If using strobes, set your shutter to your camera's sync speed, typically 1/200s. If using continuous lights, a shutter speed of 1/125s should be sufficient, adjusting ISO if needed to get a proper exposure on the highlights.
- Alternatives
- A 50mm f/1.8 would require you to be closer to the subject, creating a slightly more distorted, immediate feeling. A 135mm f/2 would compress the scene further, flattening the subject's features beautifully and requiring more space to work in, resulting in a more formal, detached portrait. A 35mm f/1.8 would be a stylistic departure, creating an environmental portrait look with significant perspective distortion if you moved in for this framing; it would feel more raw and less classical.
Lighting setup
- 1key · above · medium
- 2background · below · near
1.Key: Gridded Stripbox or Small Softbox
Positioned about 4-5 feet from the subject, at a 45-degree angle to camera left, and raised to about a 30-degree angle pointing down. The grid is critical for preventing light from spilling onto the red background and for creating the sharp falloff into shadow.
This is your only light on the subject. Its hardness is key. A smaller source or a grid will produce a sharper shadow edge. There is no fill light; we want the shadows to be as deep as possible.
Recreate the look
Starting-point editing settings for each app. Fine-tune against your source image.
Apple Photos
- Exposure
- +0.10
- Contrast
- +40
- Black Point
- +30
- Saturation
- +25
- Warmth
- -5
Slightly lift the overall exposure to brighten the skin.
Significantly increase contrast for dramatic shadows.
Crush the blacks to ensure deep, pure shadows.
Boost overall color, primarily affecting the red background.
Introduce a slight coolness to the highlights and whites.
Equipment list
85mm f/1.8 Prime Lens
Provides ideal compression and working distance for a flattering portrait.
Budget option: 50mm f/1.8 lens
View on AmazonStrobe or LED with Gridded Stripbox
To create a controlled, hard key light with sharp falloff.
Budget option: Bare bulb lamp with homemade barn doors or a snoot made from cardboard.
View on AmazonC-Stands
To securely position lights and negative fill exactly where they are needed.
Budget option: Lightweight light stands or tripods.
View on AmazonRed Seamless Paper (9ft roll)
Creates a clean, vibrant, and non-reflective background.
Budget option: A red blanket or fabric sheet, steamed to remove wrinkles.
View on Amazon
Creative direction
Art & staging
The subject is staged off-center, occupying the left third of the frame. Her body is angled away from the camera, but she turns her head back towards the light, creating a dynamic pose. The white, high-necked top is essential; it creates a strong point of contrast against her skin and the red background. The fan is a prop used to add a graphic element in the lower right, mostly rendered as a silhouette to balance the composition without distracting from the subject's face.
Director's commentary
This shot is about quiet confidence and mystique. The lighting choices intentionally obscure half of the subject, asking the viewer to wonder about what is unseen. Direct the talent to find a pose that feels strong but relaxed. Her eyeline is critical; she is not looking at the camera, but past it, towards the light source. This creates a feeling of introspection or of being preoccupied with something outside our view. It's a moment of caught thought, not a performance for the camera. The expression should be neutral to contemplative, allowing the lighting and composition to carry the dramatic weight.
On a budget
Use a single, bare-bulb lamp or a cheap LED panel with black cardboard taped around it to create a 'snoot' for your key light. A large window on an overcast day can also work if you use black fabric to flag off most of it, creating a smaller, harder source. For the background, a red fleece blanket or a sheet from a fabric store will work; use a desk lamp to light it from behind the subject. A large piece of black foam core or even a black t-shirt held up on a stand can serve as your negative fill.