Ceeniq · Shot Blueprint
Medium wide · stylized lighting
July 12, 2026
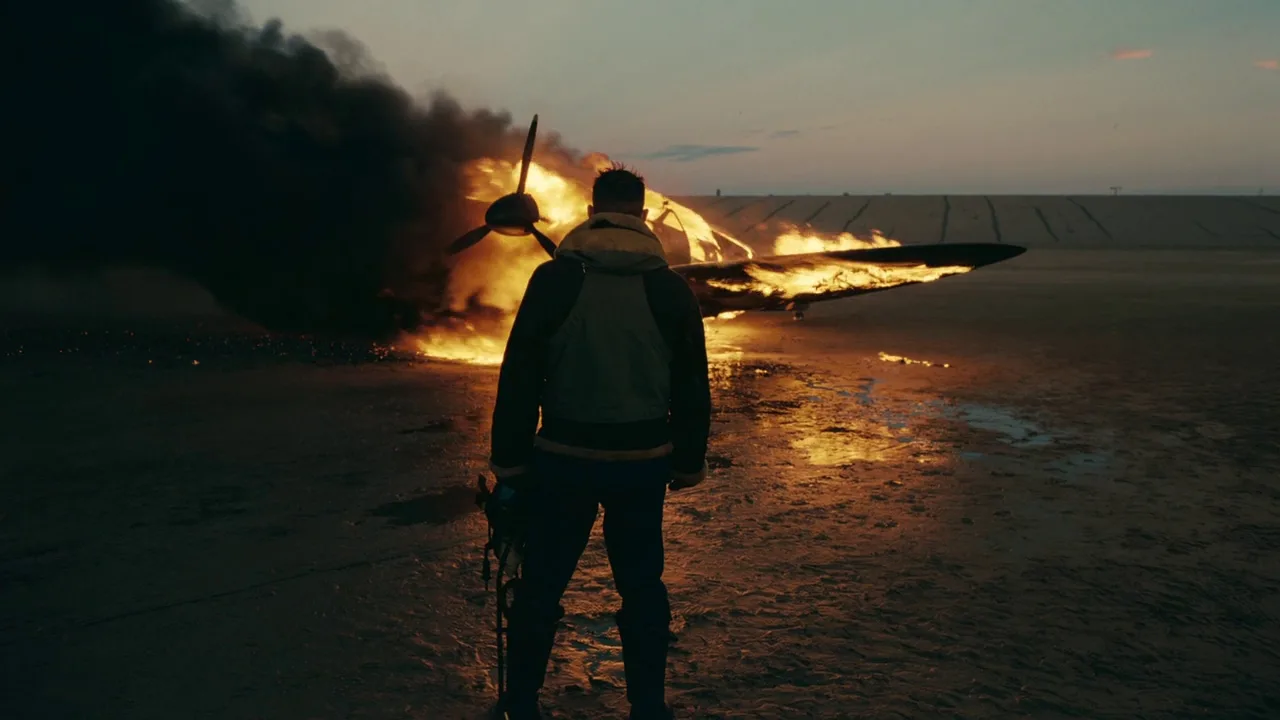
This shot captures a lone figure silhouetted against the burning wreckage of a plane at dusk, creating a powerful image of desolation and the aftermath of conflict. The contrast between the intense, warm fire and the cool, fading light of the sky effectively isolates the character and emphasizes the scale of the destruction. It's a masterclass in using practical light sources to define both mood and narrative.
This is a study in controlled naturalism, balancing a powerful practical light source against the fading ambient light of dusk. The shot's power comes from its simplicity: a single figure, a single source, and a vast, empty canvas. Success hinges on precise timing during the magic hour and careful collaboration with the special effects team to manage the fire and smoke.
Camera setup
- Lens
- This was shot on large format film, so the lens is likely a 75mm IMAX or Hasselblad lens. This gives a natural field of view with slight compression, isolating the character without feeling like a telephoto shot. To replicate this on a Super 35 sensor, a 50mm prime would be a good match. For a full-frame mirrorless, a 50mm or 85mm would work well. A cheaper alternative like a vintage Canon FD or Nikon AI-S 50mm f/1.4 would provide a similar field of view and pleasing character.
- Position
- The camera is positioned about 15-20 feet behind the subject, at chest height, roughly four feet from the ground. The angle is dead-on, perpendicular to the actor's back. This creates a formal, observational perspective that puts the viewer directly behind the character, sharing their point of view.
- Settings
- Start with your camera at its base ISO, likely 800. To capture the remaining ambient light in the sky, you'll need a reasonably open aperture; a T-stop of 2.8 is a good starting point. Shutter angle should be 180 degrees. The fire is the brightest object, so expose for it, letting the character fall into a near-silhouette while holding some detail in the sky. You may need to stop down to T4 if the fire is too hot for the sensor.
- Alternatives
- A 35mm lens would make the character appear smaller and more lost in the vastness of the environment, emphasizing his isolation. An 85mm lens would compress the background, making the fire feel larger and more oppressive, creating a more claustrophobic and intense feeling. A 50mm anamorphic lens would introduce horizontal flares from the fire and stretch the background, further accentuating the width of the desolate landscape.
Lighting setup
- 1back · at eye level · medium
- 2ambient · overhead · far
1.Key / Practical: Burning Airplane
The fire source is located inside the airplane prop, about 15 feet in front of the camera and 10 feet behind the subject. It is spread horizontally across the frame, acting as a powerful backlight.
This is your main light. On a professional set, this would be a series of propane fire bars controlled by a special effects technician for safety and consistency. The goal is a strong rim light on the subject's shoulders and head, and enough output to brightly illuminate the wet ground. The intensity must be carefully balanced with the fading twilight.
Equipment list
Large Format Cinema Camera (e.g., ARRI Alexa LF)
To capture the epic scale and rich detail of the scene. The larger sensor enhances the feeling of presence and provides a unique depth characteristic.
Budget option: A full-frame mirrorless camera (e.g., Sony A7S III, Blackmagic Pocket 6K).
View on AmazonFast Prime Lens (e.g., 50mm or 85mm T1.5)
Allows the camera to capture enough light during the dark twilight portion of the shoot while maintaining a sharp image.
Budget option: A vintage f/1.8 still photography lens with an adapter.
View on AmazonSFX Propane Fire System
Provides a large, controllable, and safe fire effect that can be reset and repeated for multiple takes. Essential for professional work.
Budget option: A large bonfire in a steel fire pit (with all necessary permits and safety personnel).
View on AmazonHeavy Duty Tripod (e.g., O'Connor 2575D)
Keeps the camera perfectly static and stable, which is essential for a shot that derives its power from its stillness.
Creative direction
Art & staging
The scene is staged on a vast, flat, and featureless landscape, like a beach at low tide or a salt flat. The ground absolutely must be wet to create the specular reflections from the fire; this doubles the visual impact of the flames. The subject is placed centrally, his back to us, creating a strong, iconic silhouette. He should be positioned far enough from the fire to be safe, but close enough to feel its heat and light. The burning plane wreckage serves as the primary set piece, and the SFX team should direct the heavy black smoke to billow towards the upper left quadrant of the frame to balance the composition.
Color grade
Start with a cool white balance, around 4800K, to emphasize the blue tones in the twilight sky. Use an S-curve to add contrast, crushing the blacks so that the shadows have very little information, making the silhouette stark. Use a secondary qualification to isolate the oranges and yellows of the fire. Boost the saturation and luminance of these colors significantly. Desaturate the rest of the image, particularly the blues of the sky and any brown tones in the sand, to make the fire the singular point of color and life in the frame. Finish with a layer of medium film grain to add texture.
Director's commentary
This is a shot about the quiet moment after the calamity. It's a full stop. By placing the camera behind the character, we deny the audience his emotional reaction and instead force them to inhabit his perspective. We are watching what he is watching. The performance note is stillness. The actor should carry the weight of the preceding events in his posture alone. He is not fighting anymore; he is simply enduring the sight of his failure or survival. Any movement must be minimal, earned, and heavy. The drama is in the contrast between the violent, roaring fire and the profound, static silence of the man watching it.