Ceeniq · Shot Blueprint
Medium wide · silhouette lighting
July 12, 2026
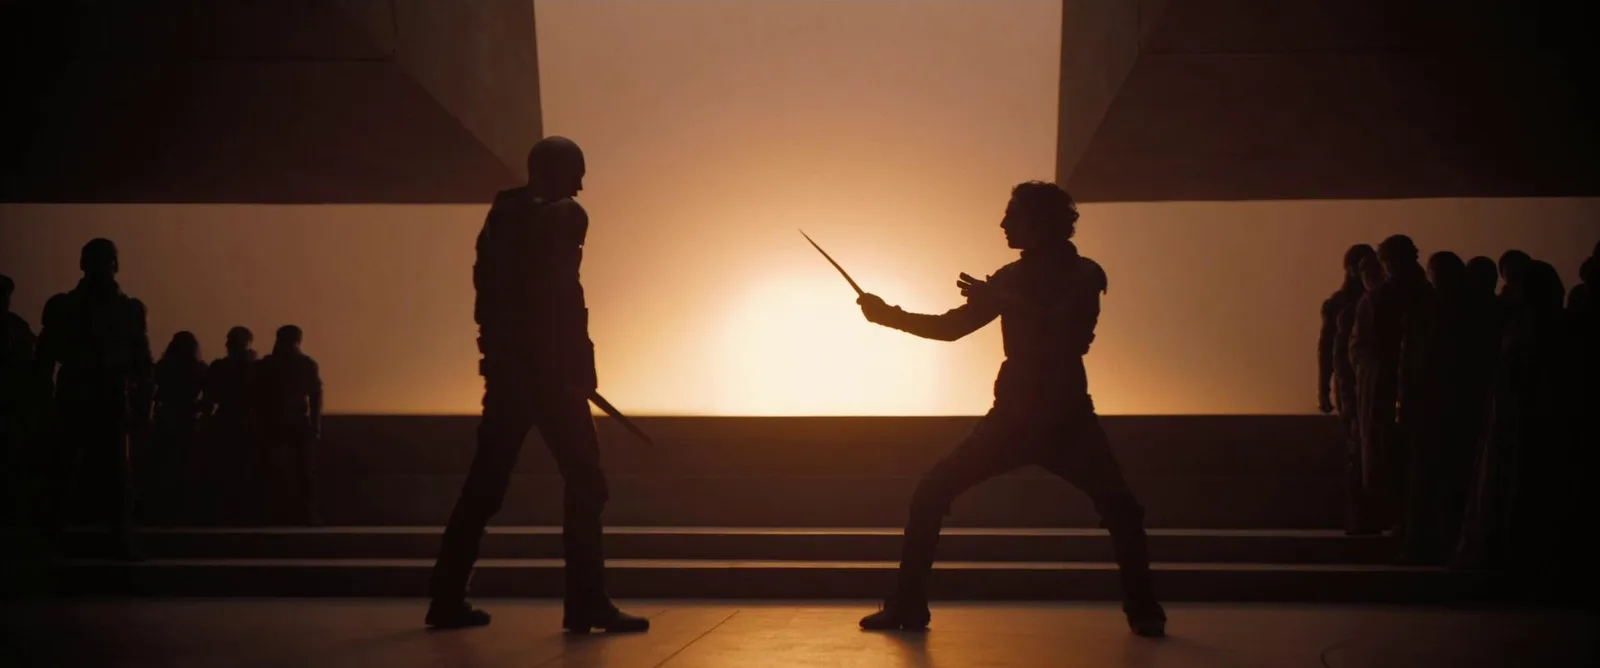
This striking wide shot captures two figures in a tense standoff, silhouetted against a monumental, glowing backdrop. The powerful backlighting and clean, symmetrical composition imbue the scene with an epic and dramatic sense of confrontation, drawing the eye directly to the central conflict. It effectively uses light and shadow to heighten the emotional weight of the moment.
This is a study in brutalist simplicity and scale, achieved through pure silhouette. The entire shot is defined by a single, massive, warm backlight. The composition is rigid and symmetrical, treating the characters as graphic elements in a larger architectural frame. The goal is to create a sense of mythic confrontation, where the environment itself sets the stakes.
Camera setup
- Lens
- An 85mm T1.5 prime lens, likely an ARRI Signature Prime or Cooke S7/i. This focal length provides excellent compression, making the background feel vast and close while isolating the dueling figures. The look is sharp but not clinical. A cheaper alternative would be a Rokinon or Samyang 85mm T1.5, or a vintage stills lens like a Canon FD 85mm f/1.8 adapted for your camera.
- Position
- The camera is positioned dead center, perfectly level, at about chest height to the subjects. It's static, locked off on a solid tripod or dolly. Distance to the subjects is likely 25 to 30 feet, far enough to create a formal tableau and capture the full scale of the set.
- Settings
- Expose for the bright background, not the subjects. Start with your camera's native ISO, around 800. Set the aperture to T4 or T5.6 to hold focus across the main action while letting the background fall slightly soft. Shutter angle at 180 degrees. You will likely need significant ND filtration (ND 0.9 or 1.2) to manage the powerful backlight and maintain your desired T-stop.
- Alternatives
- A 50mm lens would make the shot feel wider and more environmental, slightly diminishing the monumental scale of the background and the intensity between the subjects. A 135mm lens would heavily compress the scene, making the background feel like an enormous wall of light directly behind the actors; this would be a more claustrophobic and intense framing, sacrificing the sense of architectural space.
Lighting setup
- 1back · at eye level · far
1.Key: Massive Backlight Wall
Directly behind the subjects, filling the entire background of the frame. This is likely a 20x20 foot or larger frame of heavy diffusion, like Full Grid Cloth, placed 15-20 feet behind the action.
This diffusion is blasted from behind by multiple high-power lights, like four ARRI M90 HMIs. They must be gelled with Full CTO to achieve the deep amber color. The intensity is extremely high, acting as the sole source and creating the silhouette. The size creates the soft gradient from the central hot spot.
2.Negative Fill: All Sides
Use large 4x4 solid flags or 12x12 blacks on both sides of the camera, as well as a topper to flag light off the ceiling.
Recreate the look
Starting-point editing settings for each app. Fine-tune against your source image.
Apple Photos
- Highlights
- -70
- Shadows
- -100
- Black Point
- +85
- Contrast
- +40
- Warmth
- +90
Softens the central glow to prevent it from looking harsh.
Crushes all detail in the foreground into a deep silhouette.
Ensures the shadows are pure black, without any lifted feel.
Increases the separation between the dark foreground and bright background.
The primary tool to achieve the strong amber/orange hue.
Equipment list
Large Diffusion Frame (e.g., 20'x20' Full Grid Cloth)
To create the massive, soft backlight that defines the entire shot.
Budget option: A large white wall or a king-sized white bedsheet stretched tight.
View on AmazonHigh-Power HMI Lights (e.g., ARRI M90)
To provide the intense illumination needed to blow out the diffusion and create the bright background.
Budget option: Aputure 600d, or multiple powerful LED work lights.
View on AmazonFull CTO Gels
To give the backlight its distinct deep amber/orange color.
Budget option: Cheaper lighting gel sheets from Rosco or Lee.
View on Amazon85mm Cinema Prime Lens
To provide flattering compression and isolate the subjects against the background.
Budget option: Rokinon 85mm T1.5 Cine DS or a vintage manual focus 85mm stills lens.
View on Amazon
Creative direction
Art & staging
The set design is minimalist and monumental. The floor should be a dark, non-reflective material. The steps behind the subjects provide crucial horizontal lines that ground the composition. Subjects are staged symmetrically, creating a balanced confrontation. The crowd on either side should be arranged to create strong, varied silhouettes. Wardrobe is critical: it must have a sharp, recognizable profile to read clearly in silhouette.
Director's commentary
This shot is about ritual and inevitability. The stark silhouettes strip the characters of their individuality, turning them into archetypes locked in a fated conflict. The rigid symmetry and static frame give the scene a sense of formal importance, like a religious ceremony. Direct the actors to use clear, deliberate movements; every gesture is amplified. Their stances should be strong and defined. The tension comes from the stillness and the anticipation of violence within this grand, imposing space.
On a budget
You don't need a massive studio. Find a large white wall or hang a seamless paper backdrop. Place your most powerful light (an Aputure 600d, or even a few construction work lights) on the floor behind your subjects, aimed at the wall to create a large hot spot. Use a hazer or fog machine sparingly to bloom the light and soften the background. For negative fill, use black sheets, blankets, or painted cardboard. Shoot in a dark room to control ambient light.